The main reason for trying the Nikon Z7 was the size factor and new features. Even though the D810 is not a heavy camera (880 g), it's almost 400 grams heavier than the Z7 (585 g) with fewer megapixels and weaker video features. The native lenses are also smaller and less heavy as the equivalent DSLR lenses. Even with the FTZ–adapter, it's much lighter, and the 24–70mm f/4 S mount lens weights only 500 grams. It will be fun to see the size and performance of the upcoming Nikkor S 14–24mm f/2.8 lens compared to the old legendary F-mount lens. The in-body stabilization, touchscreen, 45,7 MP sensor were something I wanted to try out as well.
I must admit that it took me some time to go through all the settings before I started to shoot with the camera. Once I got everything set up, the shooting was relatively easy. I got used to the electronic viewfinder rather quickly. There were a couple of changes in the button layout from the D810. The ISO-button, for instance, is moved to the right side of the camera, which makes sense, because now you don't need two hands to change the ISO settings.
The RAW image files, man they are big. I know the new Sony mirrorless cameras have more megapixels than the Z7, so it's not quite the flagship in terms of megapixels, but because I own a lot of Nikon lenses, which work perfectly with the FTZ-adapter I prefer to stick with Nikon Z7 at least until the Z8 comes out. With the 45,7-megapixel sensor, the file size is acceptable. The resolution of the RAW files is 8256 x 5504 pixels. The editing capability of the files is top-notch. The dynamic range is not as good as the D850, as I have read from some reviews, but it's near the same. I'm used to great RAW files from the D810, and to be fair, I don't think there is a massive difference between the D810 and Z7 cameras. It's not better nor worse.
For night photography, the ISO performance is good. Similar to the D810, it's nothing spectacular but not bad either. You can get decent images when you push it to ISO 8000 when exposing the shot correctly. For me, in dark situations, I tend to use the ISO 6400 with the Z7, and for daylight, sunset, and sunrise photographs, I use the native ISO 64.
I use the Nikkor S 24–70 f/4.0 when I'm taking just one lens to go. It's an excellent versatile lens with a nice focal length. However, when I'm photographing at night or landscapes, I take the trusty Nikkor 14–24 mm f/2.8 and the Sigma 20 mm f/1.4 and 70–200 f/4.0 VR lenses with me. The beautiful thing about the 24–70 f/4.0 S-lens is that it's completely silent if you care to take some videos while using the autofocus.
Nikon Z7 system usage is great, and it is decent to hold with my big hands. It's not as good as the D800 series, but the handling is still very good. Small buttons and tight spacing make it harder to operate the Nikon Z7 camera with gloves, especially in dark situations. You can't feel the buttons so well, but it's a common problem with most of the mirrorless cameras I have tested.
One small problem I have had with mine when I use it in freezing weather, -20°C or lower. Since I have only tested mine, I can't tell if it's a problem with others, and by quickly googling, it seems not to be a common problem, or maybe most people don't use it in harsh conditions… So, what's the problem? Occasionally, when used in freezing temperatures, the camera shows an error message: "cannot read the memory card," and then you have to take it out and put it in again and it usually works fine for a period of time. I have used two different XQD memory cards in the extreme weather, so it seems not to be just a memory card problem. However, the problem can occur when I shoot bursts of images in cold weather, and the camera needs time to write to the memory card. It has happened to me twice, so that none of the shots were written to the memory card, which is awful. I haven't tried the new CFexpress cards yet which were added as a supported format with the v2.20 firmware. I'll make an update when I get my hands to a CFexpress card.
What I like about the camera are the screens and overall responsiveness. You can easily flip between the back screen and viewfinder quickly and effortlessly. Battery life is nothing special, but it can hold the same batteries as the D810, so I don't have to carry two different types of batteries with me even when I bring both of the cameras on a trip. It doesn’t perform as well as the D810 obviously due to the screens. You can get over 300 shots with a single battery, and to be fair I have gone over 400 with it if I don’t shoot long exposures.
The one part of the Z7 I wish Nikon did better is the eyepiece. Since I'm pushing the camera quite firmly to my eye for more stability as I move the camera to view the image on the back screen. The rubber part of the eyepiece doesn't go back to its normal form, so the auto switch doesn't recognize that I have moved my eye from the viewfinder because it's blocking the eye detector. It isn't very pleasant. The issue happens more often in cold temperatures as well because of the rubber gets stiff.
A quick solution for this problem is to take the eyepiece out altogether. However, when it's cold outside, and you put your eye to the viewfinder without the rubber piece, it can be quite cold for your face.
So overall, what can I say? I think it's an excellent mirrorless still camera for landscape photography. The dynamic range is excellent and the overall image quality is superb. You can shoot videos with it too, but RAW video format is not supported unless you add an external solution like Atomos Ninja V. I plan to test the RAW recording as soon as I get my hands on an Atomos Ninja.
What I like about the camera:
Overall camera usage
Dynamic range & image quality
Lens options (with the FTZ-adapter)
Focusing in low light
Charging the camera with USB-C
Support for CFexpress cards (with firmware v2.20)
What I don't like about the camera
Battery life and usage in cold temperatures
Single XQD memory card slot
Issues with the eyepiece and memory cards (Might be my camera only)
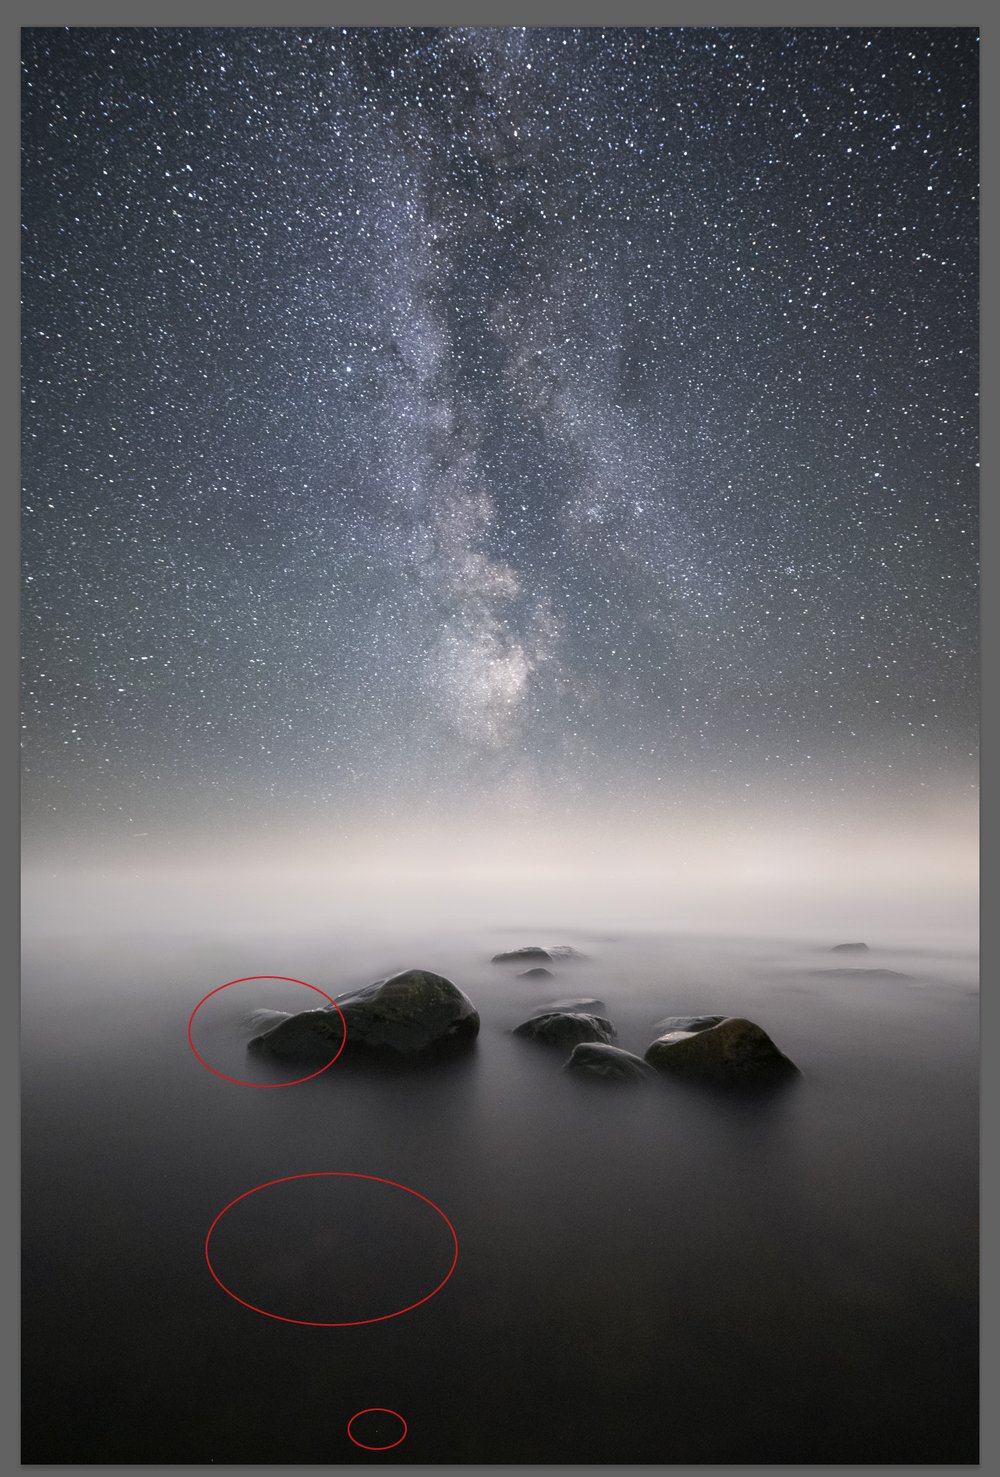
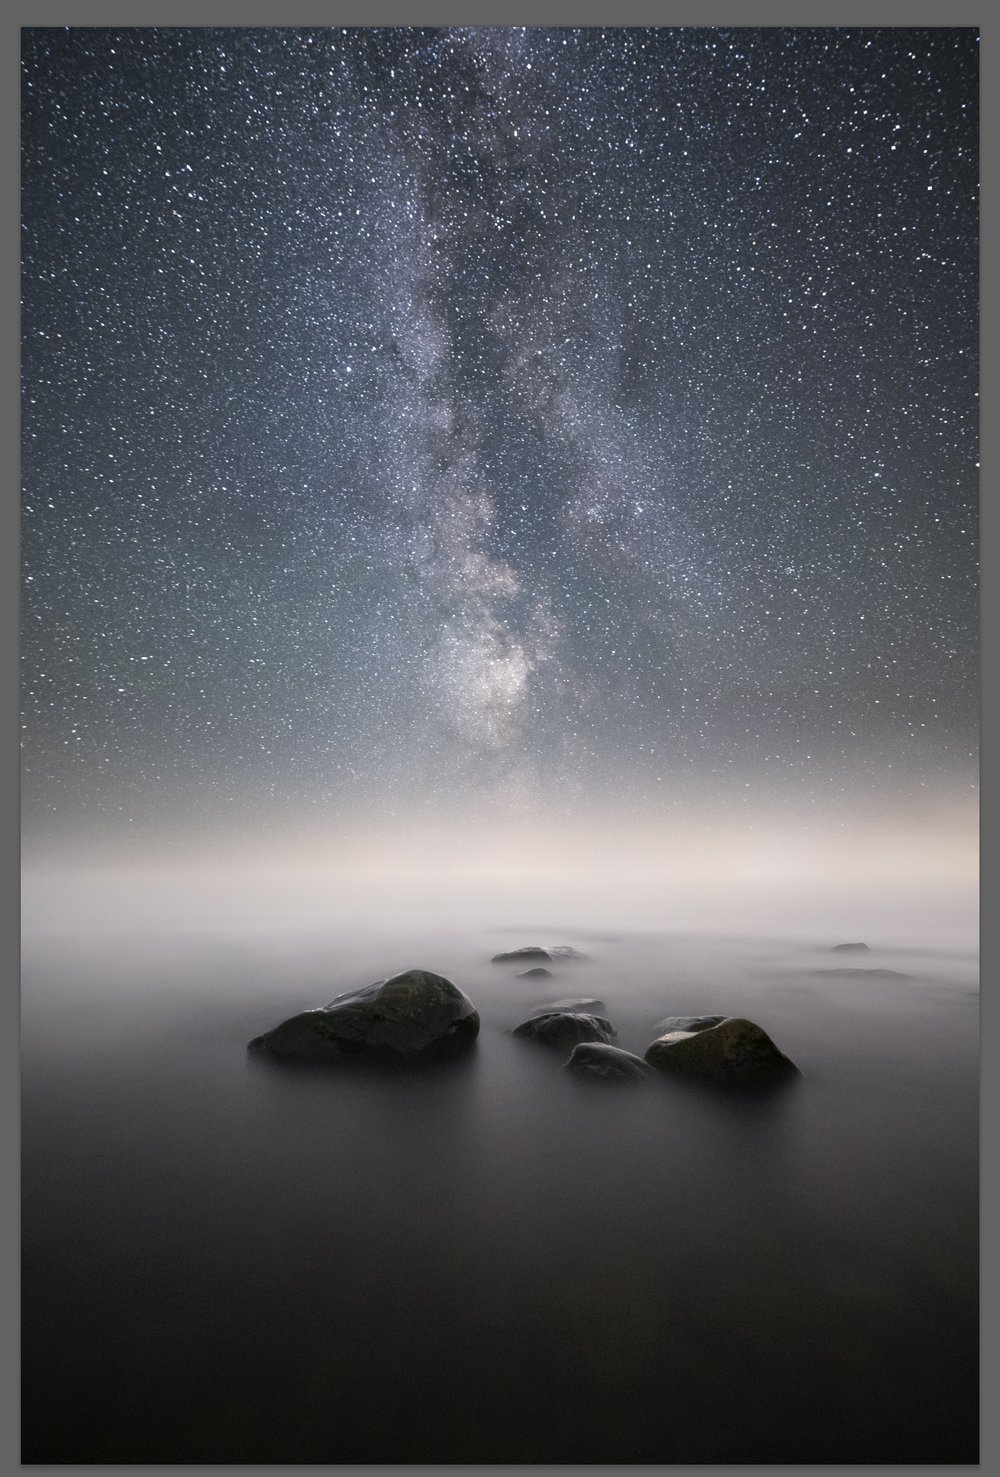
All shots below were taken with the Nikon Z7 and edited with my Atmosphere Presets collection.
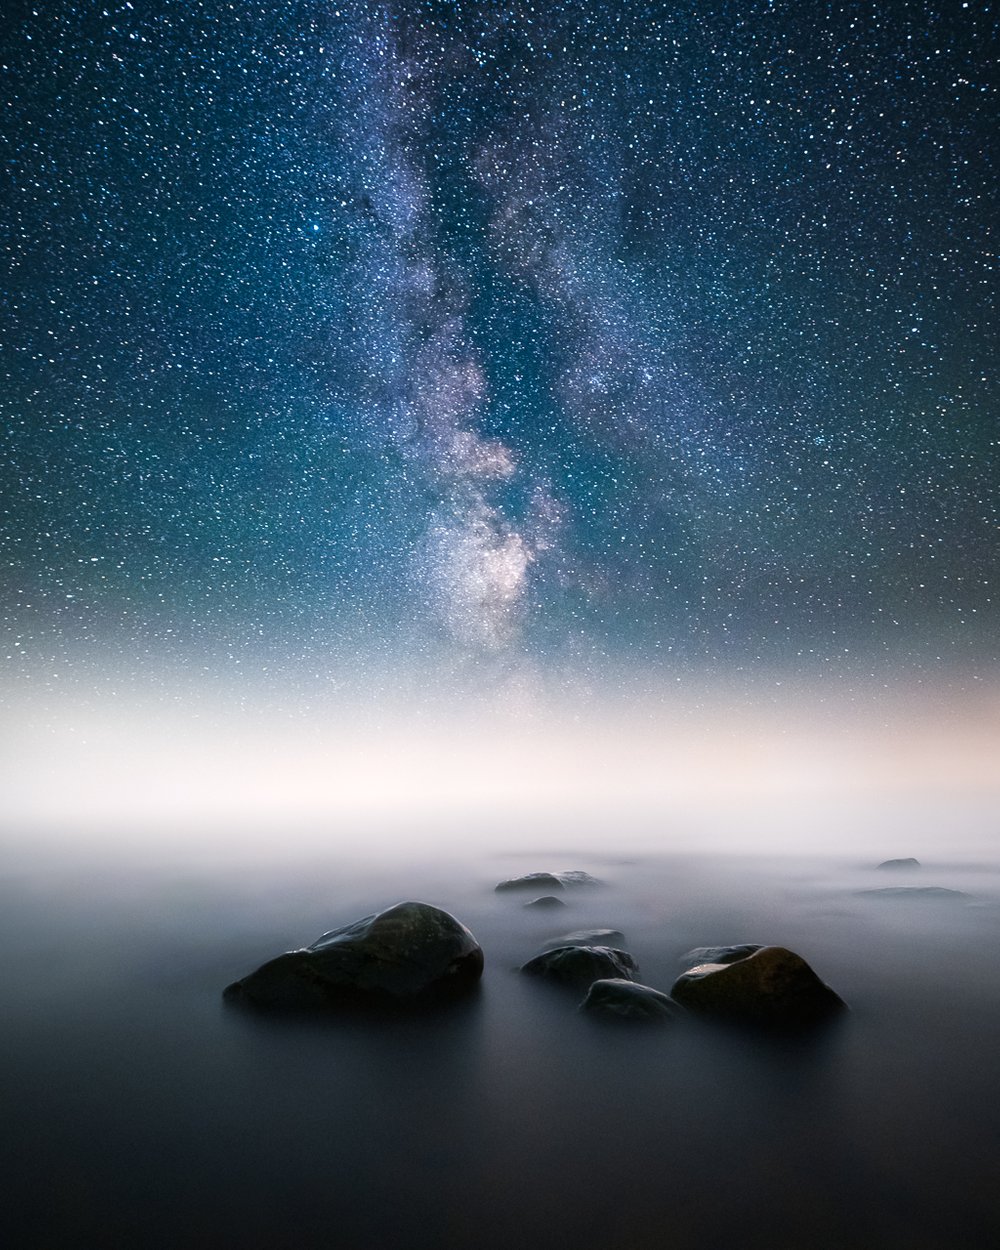
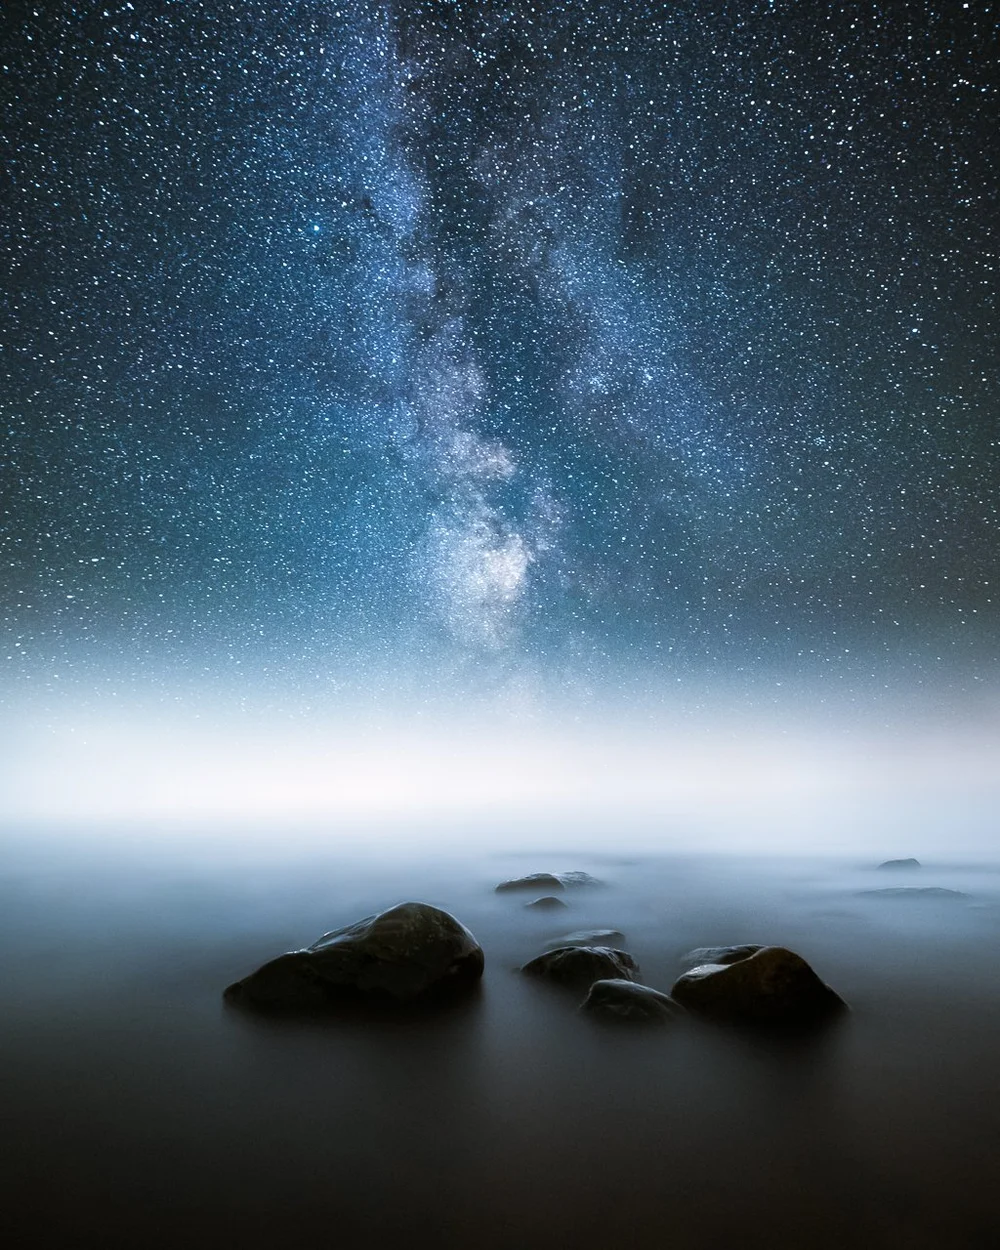
Nikon Z7, Nikkor S 24-70 mm f/4.0 @ 24 mm, ISO 6400, f/4.0, 20 sec.
Nikon Z7, FTZ-adapter & Nikkor 14–24 mm f/2.8 @ ISO 5000, 14 mm, f/2.8, 25 sec.
Nikon Z7, Nikkor S 24-70 mm f/4.0 @ ISO 100, 70 mm, f/4.0, 1/100 sec.
Nikon Z7, Nikkor S 24-70 mm f/4.0 @ ISO 64, 24 mm, f/8.0, 1/125 sec.
Nikon Z7, Nikkor S 24-70 mm f/4.0 @ ISO 100, 24 mm, f/9.0, 1/160 sec.
Nikon Z7, Nikkor 14–24 mm @ ISO 64, 14 mm, f/8, 0,5 sec.
GET THE LATEST CONTENT FIRST
If you like this post. Subscribe to be the first to receive fresh new tutorials straight to your inbox!
In this article, I talk about habits that, in my experience, boost creativity. Some of these habits I have learned from dozens of self-help books. Some are my own experiences from trials and errors in the past decade. I also tell you what my typical day looks like as a landscape photographer while I’m not on the road traveling. With further, ado, let's dive in.
1. Sleep
I think it's fundamental to start with one of the easiest to change and yet extremely powerful habits: sleep.
Sleep is essential for energy and creativity, and that's why I try to get at least seven to nine hours of sleep every night. I wake up between seven and eight a clock in the late autumn and winter. In the summer and spring, I wake up much earlier if I plan to go out for a morning shoot. I find it essential to have some structure in my daily life, and the sleep schedule is an excellent way to get some structure.
2. Routines
Building routines to spark inspiration and motivation towards your everyday life is key to being constant with your creativity.
My day usually begins as follows. I get out of bed, always with an intention to create something. I make the bed if my wife is getting up at the same time. I go to the bathroom and brush my teeth. The next thing I recently started doing is "body awakening" routine – a quick set of ten pushups, ten crunches, ten squats, and ten pullups. The method wakes me up if I feel tired. After I have woken up, I sit down to meditate for 10 to 20 minutes and sometimes longer. After meditation, I write one page to my journal to clear my head from ruminating thoughts. Typically the whole routine takes about 35 minutes, and as a reward, I go downstairs and drink a big glass of water and make a cup of decaf coffee. I drink it black, so I don't ruin my fast. I like the habit of grinding the coffee beans and making the coffee even though I don't get the caffeine high anymore. I used to drink a lot of coffee but never really felt more energized and only got the coffee jitter, so I decided to ditch caffeine almost entirely. Lastly, I check my Oura ring stats for the night and start my daily tasks.
3. Distraction-free time
If you want to be creative, it's crucial to have distraction-free time for yourself. Seeing constant notifications, getting distracted by other people, and multi-tasking can all have a significant impact on how creative and focused you are with your tasks.
I don't use social media or check emails first thing in the morning, and nowadays, I don't even feel the need to check my phone in the morning. I suggest that you stop using your phone or social media in the first hour when you wake up. Give it a try, at least. Going through social media is one of those habits that can make you feel sluggish and dull. Energy is a big part of creativity and creative work, so why leave it up to something other than yourself.
4. Plan and choose your main focus
In my experience, if you lack motivation and don't know where to start, focus on the main thing you want to be good at. Your main thing should always be the main thing where you spend most of your time.
There are usually three different options for how my day starts after the morning routines. I make the decision earlier in the week or the previous day to choose what to do. My first choice is always to go out for a shoot, but if the weather or timing is not right, my second choice is either write a blog post or ideas for photographs and trips. Writing has only been part of my morning routine for the past two weeks now, so I'm still learning how to do it most efficiently. The third choice is to edit photographs; I often do it when I have been shooting the day before. Of course, it's not like I always choose one thing to do each day. Instead, I go between writing, editing, and so on. My main job is photography, so I keep that as my most important thing every day.
5. Timing and rhythm
Figuring out when you are most creative is not easy, but it can benefit you tremendously throughout your life. Some people find it easy to do creative tasks first thing in the morning, and others are fine working late at night. Of course, creativity can hit you when the moment is right in the middle of the night, and you should always be open to creative thinking.
For me, the first couple of hours after I have woken up are fantastic for creative work such as writing, photography, and editing. If I'm not outside photographing, I go to my home office and start my workday. When I'm writing, I open an article I'm working on or an empty document and work through topics I would like to share with you guys and then write down my thoughts. It usually starts with an idea, but it can change, and I try to write until I feel inspired by the topic to write more. Like today, it took me some time to write an idea I was interested in, but I started with a lot of different subjects. After having a sense of what I wanted to share, it was much easier to start writing. I don't want to be over-critical about what I'm writing when I'm starting to write since it kills my creativity. The same is with photographs and editing. If I have an idea of how to take or edit a picture, I try to be open and release the self-criticizing thoughts. It's a self-awareness process. When I don't know what to write about or when I need a break, I go back and forth editing and writing; it seems to be an excellent way to get most out of my time.
If I'm heading out to shoot, I check the weather forecast the previous day and then figure out a place to visit. Sometimes I might go and drive around and see if there are any exciting sceneries, clouds or fog. For these types of shoots, I tend to have one or two good trips out of ten. So even though I spend time out photographing, it doesn't mean I get any good photographs. It's part of the process of being a fulltime photographer. I don't think it's necessary to get a fantastic picture each time, but it is something I want to have as a goal every time I head out. Having a decent plan for a shoot is a significant first step to maximize success for a shoot. You can check some of my tips for planning here.
Once I'm back home from photographing, I tend to have a break from everything photography related and catch up with my wife.
6. Improve your craft
Think of creative ways how you can get better at your craft. I have been stuck with this thinking that good photography is just a matter of how many times I go out. Which is not the only way to get better at photography. You need to learn from your experiences.
What I do instead of just scrolling IG after a shoot, I go through the photographs I took and jot down ideas for pictures or write my thoughts about the shoot. I try to answer a couple of questions. What went well? How could I have been better capturing the images? Even though a shoot might have been disappointing, I try to learn something out of it. I try to work this way every day, and I'm continually trying to find habits that give me more creativity and ways to improve my photography. Going out to photograph is just one step of being a photographer, and in my opinion, it's not enough, at least when you want to improve and strive for better photographs.
7. Traveling and planning
When you don't feel creative, try to switch things up. Plan a trip, for example.
There seems to be a fine line on how inspired and focused I am to edit my pictures. There are a lot of things that might get between me and my inspiration, but here are a few that I find easy to handle. If there are a bunch of new photographs to go through and edit, I feel inspired. However, if there are too many photos I haven't checked yet, I might lose some of my essential focus on a single photograph, and then I might find myself jumping too often between pictures. And when I'm uninspired and bored to look at my old photos and don't have any new ones, I try to go out and shoot more as soon as possible. Even planning for a shoot or trip will boost my inspiration towards photography. Having the right variety of photographs to edit is vital for creative editing.
8. Healthy habits and movement
If you want to stay creative for a long time, check your eating and moving habits. A 30-minute walk outside in the morning can have a tremendous impact on how you feel throughout your day.
Every day after I have spent time editing or writing, I go out for a walk with our dogs. I walk about 45 minutes to an hour. Either before the walk or after it, I eat my first meal of the day. Usually, something like this: three eggs, broccoli, broccoli sprouts, spinach, olive oil, and an avocado. I eat the veggies raw and cook the eggs with a gentle heat. I have done a lot of reading and self experimenting with healthy habits. What works for me is intermittent fasting for sixteen to eighteen hours, which gives me more energy in the morning, and eating nutritious food is the best way I feel energized in the long run. Ninety percent of the time, I follow healthy food choices, which is easy because I do enjoy what I eat daily. The other ten percent of the time, I permit myself to eat whatever I want.
When talking about health, movement is an essential part of being energized to create. Additionally, to the walks, I workout three to four times a week lifting weights. As off from today, I'm starting a new habit to stretch or do light yoga every day, probably right after I have done the morning routine.
9. Goals that inspire
Having goals that motivate you intrinsically is essential. Procrastination only comes if you are not motivated enough to do something.
In the evening, I tend to focus on editing and writing. I have breaks ever so often to keep my focus. I usually don't try to keep my attention more than 45 minutes and then take a short break. If I lack focus as I often do, I try to have goals that inspire and motivate me. Whenever I feel tired, I keep my tasks and goals in front of me, and that way, I can remind myself why I do the tasks in the first place. Whether I do it because I want to share the beauty of photography with others or if I want to share something that might help someone.
10. Break the routines
Even if the structure is sound. In my opinion, it's crucial to occasionally have a break from your habits and energize and give yourself a rest day.
I don't follow my habits blindly. I make a deliberate decision to have days without the "normal" routine. I feel energized to create and follow through the routine in the following days to come.
When I'm traveling, and the sole purpose is to take photographs, I focus strictly on capturing the images. Depending, of course, how long the trip is. I don't often edit my pictures until I'm back at home. I have found that this way, I'm more creative. While I'm traveling, I do backups daily, and if I can't wait to edit a picture, I might give it go on the road.
Additional habits you might want to try out that have had a massive impact not just on my creativity but overall well being:
Meditation – You can feel refreshed and creative after short meditation practice.
Journaling – It's a great way to find your creativity by journaling what's on your mind.
Deadlines – When you are desperate for creativity, have a deadline that inspires you to create. Make it public so you don't want to miss it.
Reading – There is so much you can learn by reading, and with fictional books, your mind can wander and create unique worlds.
What creative habits do you have that inspire you to create more? Let me know if you found this article useful by any means. I would love to get your feedback!
GET THE LATEST CONTENT FIRST
If you like this post. Subscribe to be the first to receive fresh new tutorials straight to your inbox!
I love to capture the northern lights, and because I get questions from people on how to capture them, I decided to share my experiences on the topic. I’m sure it is possible to photograph some kind of shots of the northern lights with our phones. However, when talking about a decent quality image, you need a DSLR or mirrorless camera, at least at the moment I’m writing this article. The gear part is continually changing, so I’m not going to spend a whole lot of time talking about it. Instead, I’ll give you advice on settings, how, when and where to capture the northern lights.
What kind of equipment is needed to capture Aurora?
DSLR or a mirrorless camera that can handle high ISO settings up to 6400 without being overly grainy. Most of the latest cameras work well with high ISO settings.
Wide-angle lens between 12 to 24 mm (full-frame equivalent) with an aperture between f/1.4 to f/2.8
Tripod
Where to capture the northern lights and when?
Go north and shoot towards the north is an excellent place to start. Some areas that I think are worthy of consideration to capture Auroras: Finnish Lapland, Swedish Lapland, Iceland, Svalbard, and Northern Norway.
Stay away from city lights. If you have captured night shots, you know how bad those lights can look on the horizon, that’s why I always recommend avoiding light pollution.
The best time to capture the Aurora Borealis is from autumn until spring.
How to know when to shoot?
Other than continually looking at the evening sky, there are plenty of different apps that show you forecast for Auroras. The forecasts use the KP index, which is a scale of geomagnetic activity. The higher the KP, the higher the chance of seeing the Aurora in lower latitudes. For example, if a place you are visiting has usual visibility when it’s KP 3, then you might want to head out even when it’s KP 2 because you might get lucky. Some of my favorite Aurora Borealis forecast apps are Aurora Now, Aurora Fcst, and My Aurora Forecast
Check the weather forecast and hope for clear skies, but remember to look out because sometimes the estimates are wrong, and you don’t want to miss out on the show!
What settings to use?
Use the manual mode on your camera and manual focusing. If you have never tested manual mode or focusing, I recommend doing both in the daylight, so you get used to it before heading out.
ISO between 800-6400 depending on the brightness of the scenery and Aurora.
Use f/2.8 or smaller f-stop numbers.
Shutter speed depends on how fast or bright the northern lights are. Shutter speed can be between 4 to 30 seconds. The most common is somewhere between 10-25 seconds in my experience. You must figure it out as you shoot. Go more prolonged exposure first and then lower it if the lights are brighter or faster than you expected. You can also reduce the ISO if the images seem to be overexposed.
Tips on taking the photographs
Try to find different perspectives: look up, look for reflections, and unique subjects.
Focus on having the Aurora in line with the subject. Circle around the subject you are focusing on and try to find creative angles.
Aurora is a great way to compose a subject because it works great as a leading line.
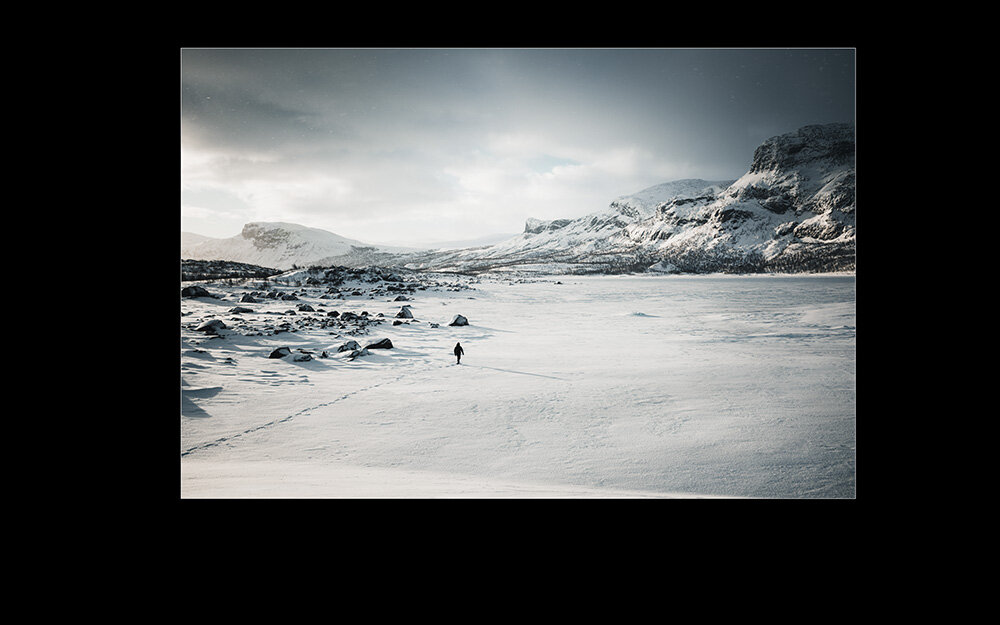
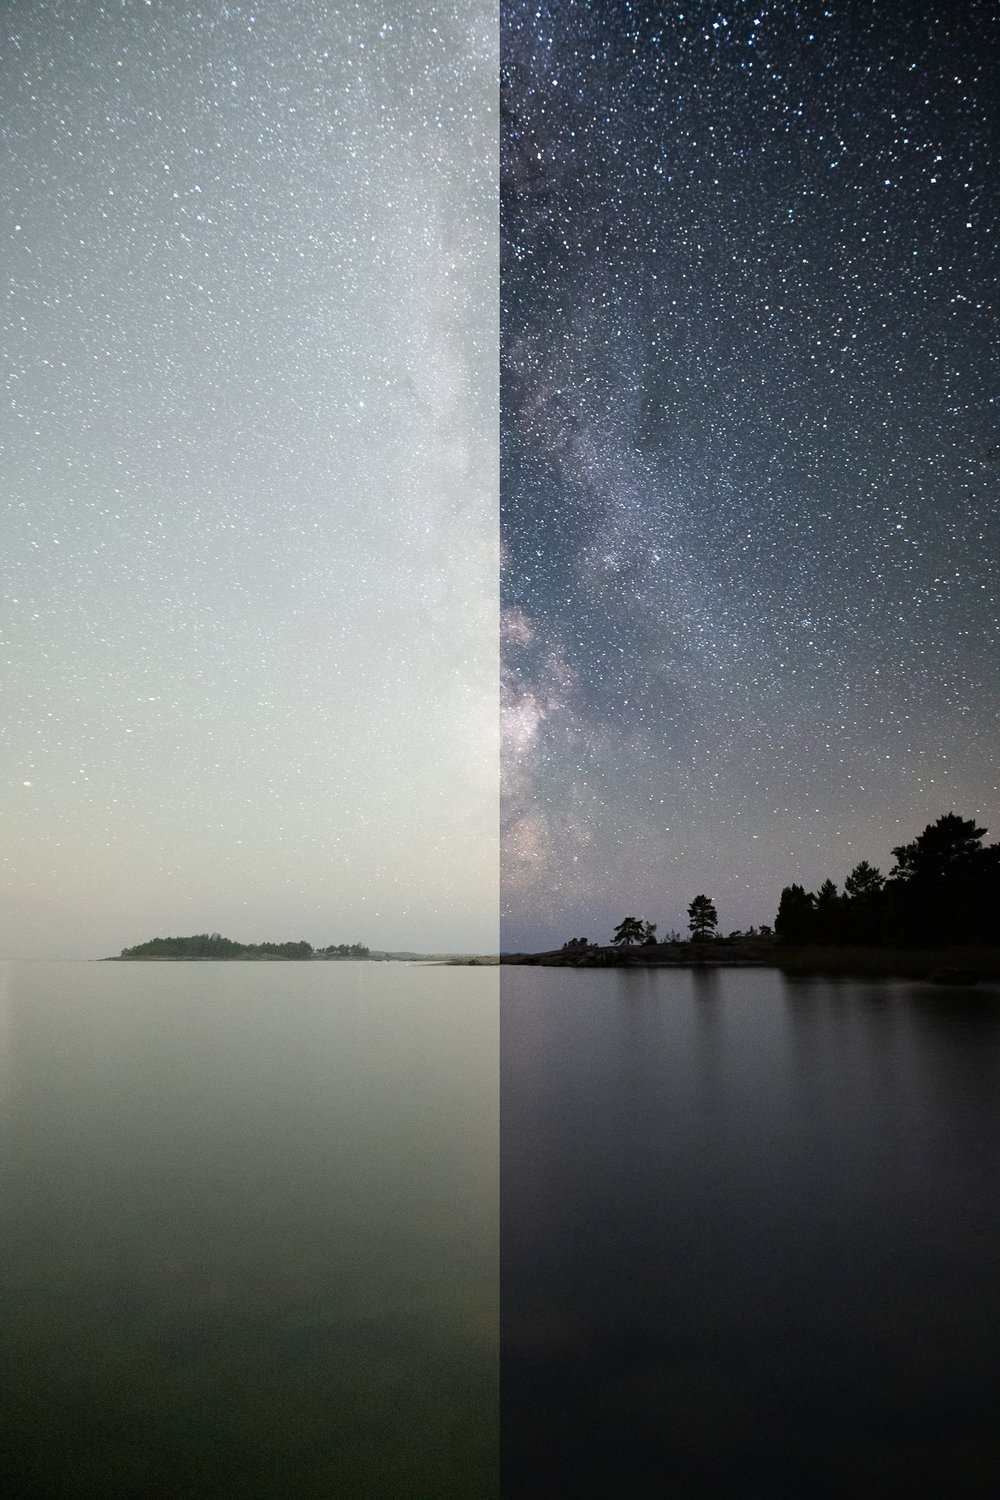
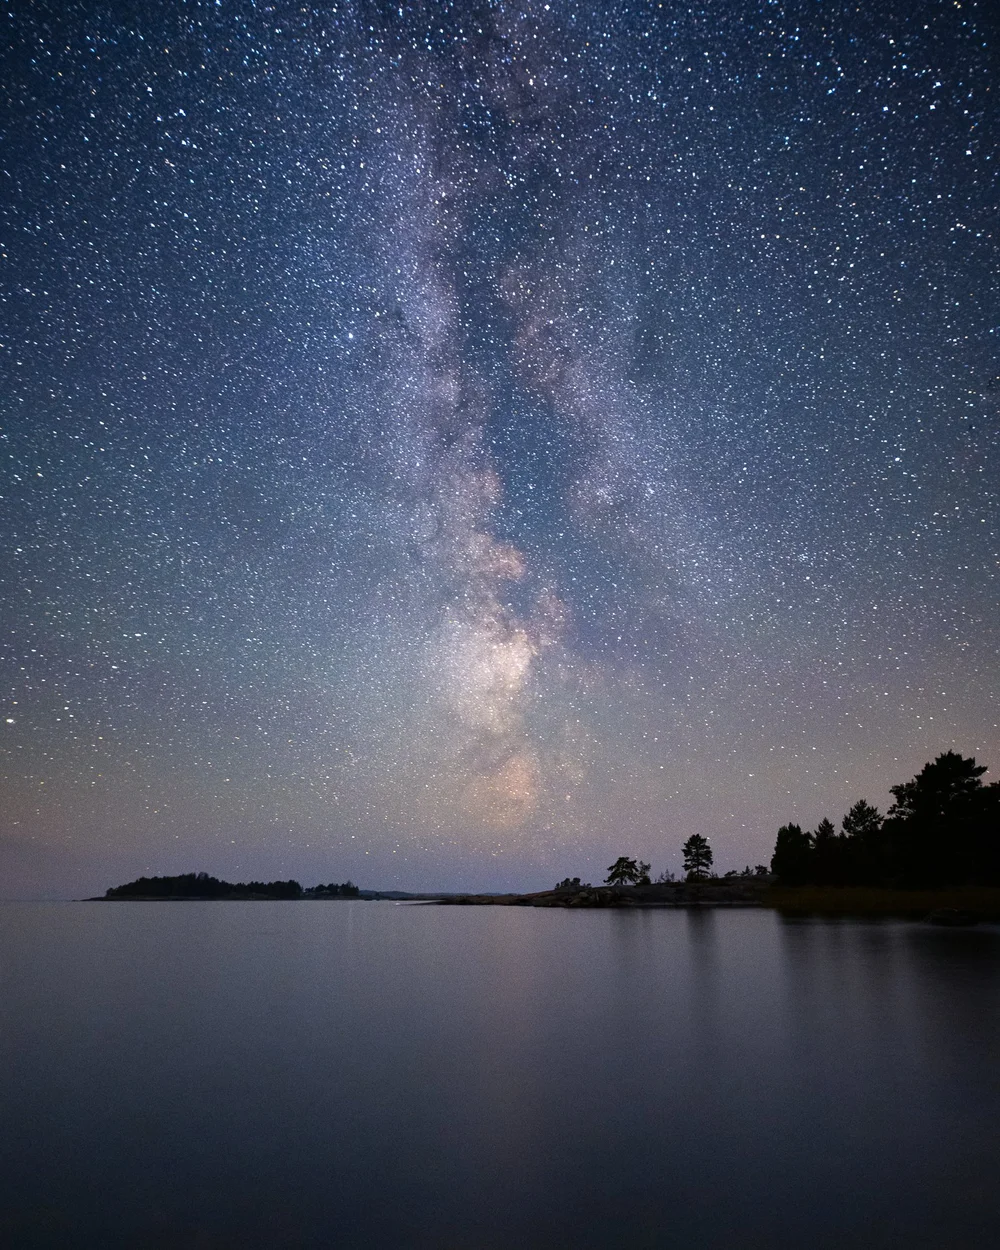
Kilpisjärvi, Finland 2018 – Nikon D810, Laowa 12 mm f/2.8 – ISO 1600, 13 sec. f/2.8
In this above photograph, I had different ways to compose it. Still, because I wanted to show the whole night sky, I opted to create a vertorama of three different horizontal photographs.
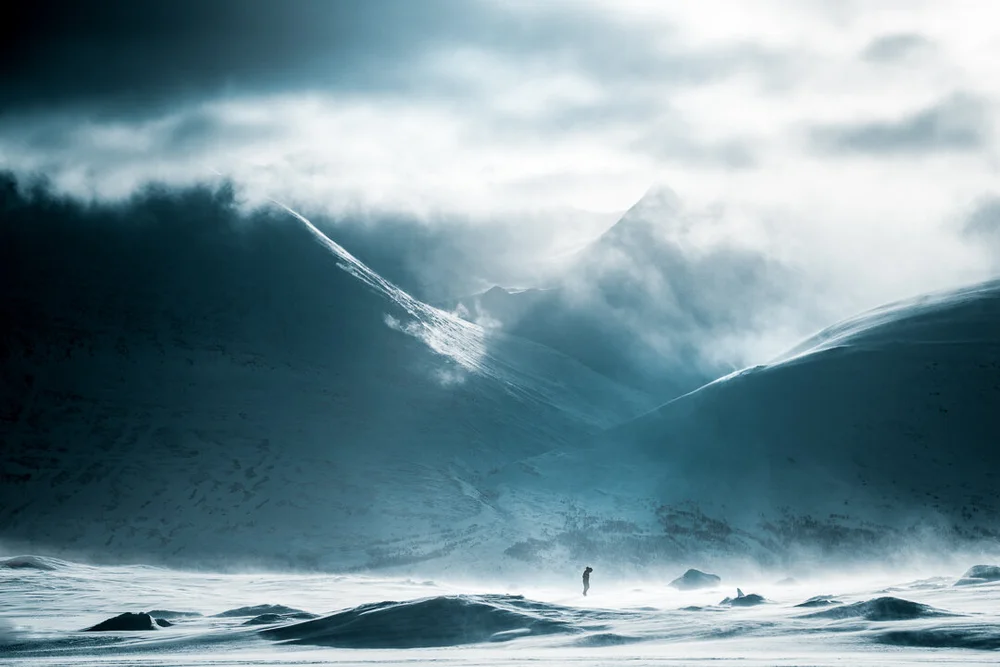
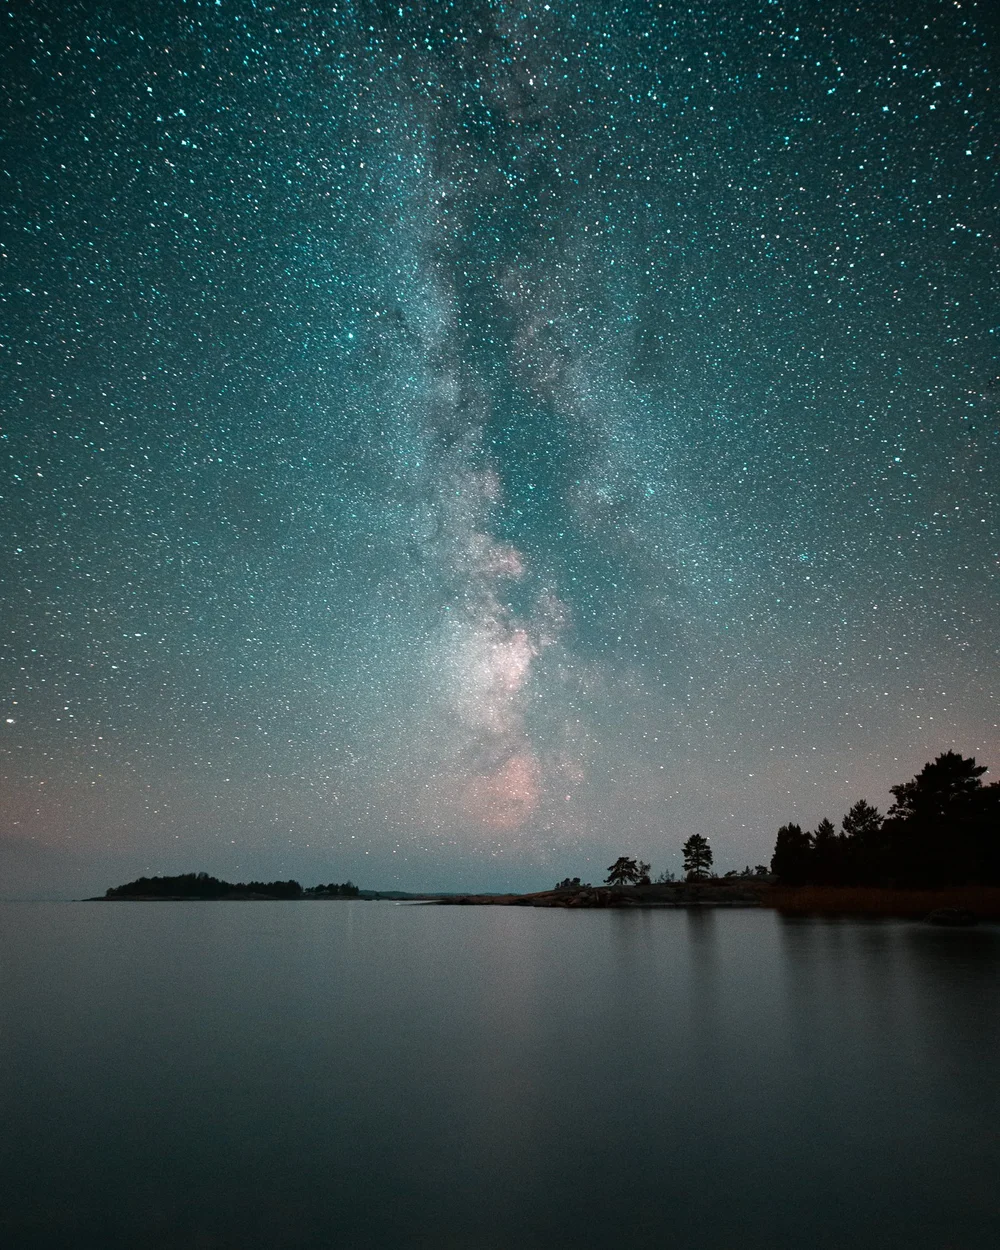
Kilpisjärvi, Finland 2018 – Nikon D810, Laowa 12 mm f/2.8 – ISO 2000, 15 sec. f/2.8
Above is another view of the same subject with an entirely different atmosphere obtained by shifting the perspective from the other side of the boat wreck. Editing the image with colder tones makes it feel more ethereal than the first shot.
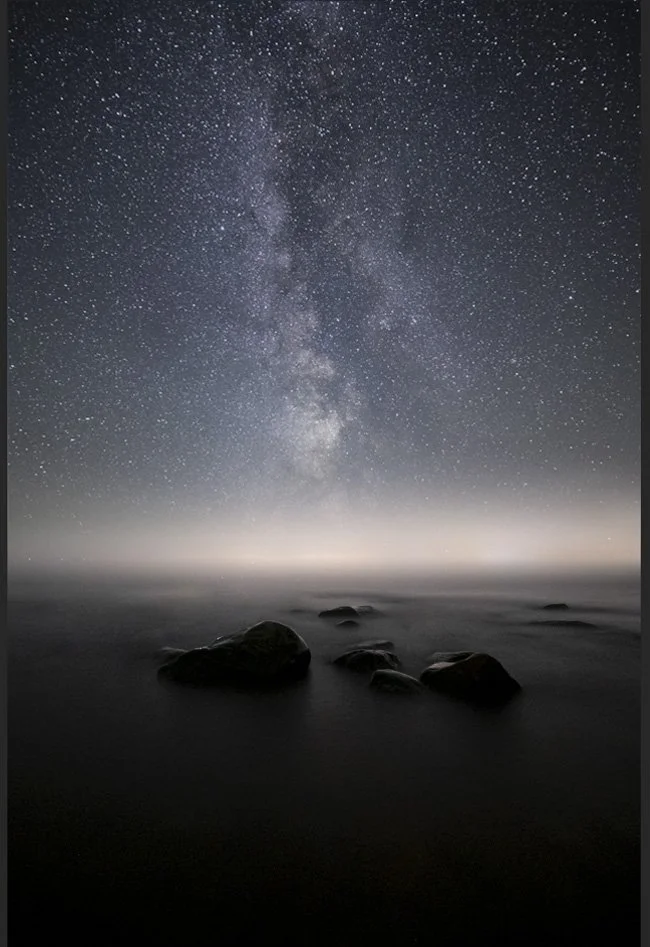
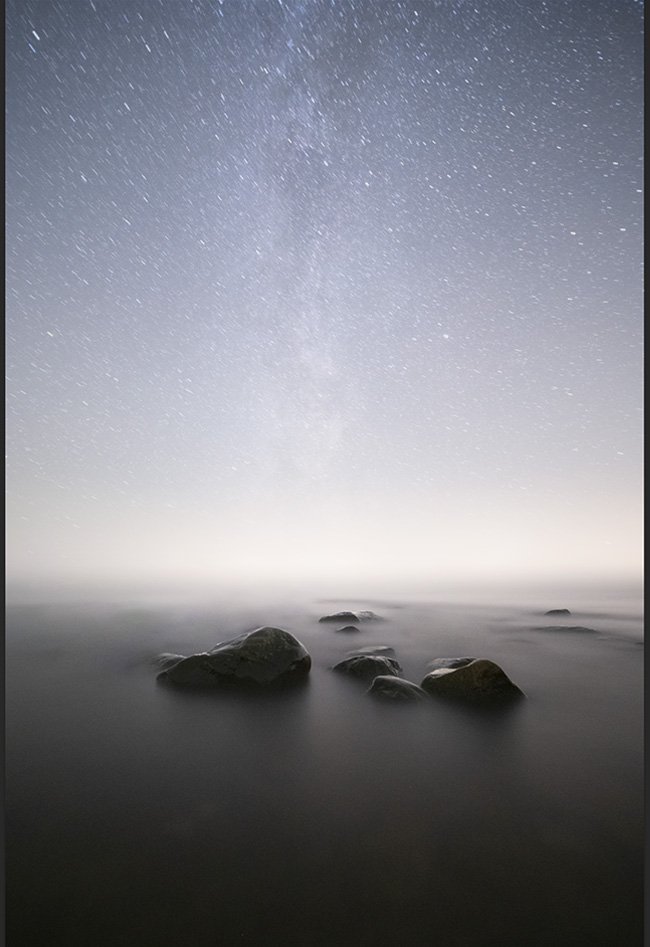
Below are some of my favorite recent northern lights photographs. Click on the image to see the equipment and settings used to capture them.
I know a lot of photographers that have made most of these mistakes, and I certainly am one of those. So, I decided to share them with some insight on how you can avoid them.
1. You don't realize how much time and work goes into creating beautiful images.
Yes, it's common to think that it doesn't take that much time to create new work. Even if you have been a photographer for some time, you forgot how much work you put into creating just a single photograph. Of course, it all depends on what type of photographer you are, but for example, if you want to put out beautiful work, it takes a lot of work. Take as much time as you can for the photography and editing part. Don't rush your work. Having a deadline is essential, but if it makes you miserable and you feel that it affects the quality of your work, try to stretch the timing and figure out realistically how long it will take you. I'm all about efficiency, but if something starts to affect the quality of my work, I try to keep my head down and put more hours into my work.
2. Comparing yourself to other photographers.
Yup, there are times when you lose yourself by looking at some other photographer's work and thinking that why can't you do the same. And then you start to lose confidence in your work. Stop comparing yourself to others. It's good that others inspire you to create; however, if it doesn't make you concentrate on your work, then it's not real inspiration. Be grateful where you are now, and keep working on getting better.
3. Not checking the images while you are photographing.
I'm sure most of us have been there. Back at home, when you had a successful photography trip, you check the images and realize that something is wrong with the picture. Either you shot slightly blurry photographs, or you thought you had a good composition even though you didn't concentrate enough. Or you might have found your images to be out of focus or shot with wrong settings like high ISO in situations that didn't need such settings. While you are photographing a subject, go through a couple of things before you move to another composition or subject: settings, focusing, sharpness, and framing/composition.
4. Spending too much time on things that takes your time from photographing.
As a photographer, there are plenty of things you can do to get income or share your photographs. Internet and social media are great to focus occasionally, but it can't be your primary focus. I certainly have felt the need to focus on stuff other than photography. However, if you keep on doing that for too long, you get lost in all the other stuff, and then you start feeling uninspired. Just go out and take photographs. Keep it simple.
5. Thinking that you know everything about photography.
Yes, I have been in a situation where I thought I knew it all. I think it's part of being a photographer or any creative professional. You start to believe that you have figured out everything, and therefore you lose yourself. You can always learn something new. Keep your head down and try to be receptive to new things. I, for one, try to learn new stuff every day. I do have times when I feel too confident about my approach. A good reminder is that we don't know much about anything in this universe. If you want to be creative, it is essential to keep learning, no matter what.
6. Focusing too much on what others might think about your work.
The thing is, you don't know what others think. Be the best you can be and don't mind what you think others might think about your work. Yeah, I know it's hard, but that's how you create original work. And it's how you keep evolving as a photographer. Creating from a place of pleasing others or being too critical of your work may make you feel stagnant and uninspired. It's important to create work that you feel inspired to create.
Organizing and going through your photographs after each shoot is one of those less focused aspects of photography, but I believe it is wildly overlooked. It’s an important part of the entire editing process. You must have an excellent system to approach editing intuitively, and that's why I wrote this tutorial.
I have worked with this approach for some time now and feel that it has helped me to organize my photographs and, in the end, create unique work. Even if you have a solid system in place, you might find some parts of this tutorial helpful. For a lot of photographers, the hardest part of photography is editing. A lot of questions raise about the editing process. Such as, how to know which photographs to edit? Where to start an edit? How to create unique looking images? I made this post as simple as possible with clear steps you can follow to create unique work. This tutorial is for those who use Lightroom CC Classic.
1. Organize
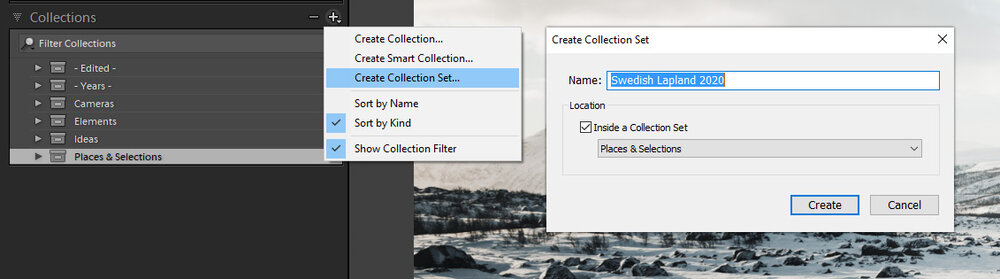
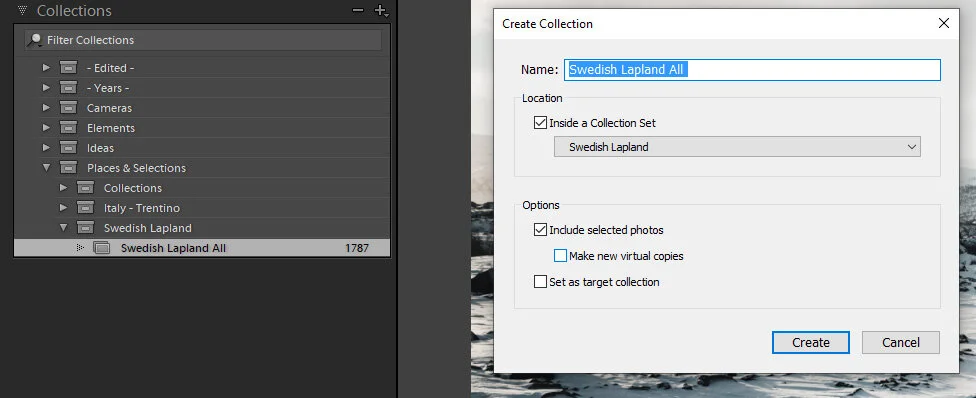
There are plenty of ways to organize your pictures. I use Lightroom Classic with various methods to organize my photographs, and here is how you can do it as well. Use Collection Sets to have neat organizing of each photoshoot. I recommend organizing your photographs straight after a shoot.
Rating images is a common way to organize photographs, but I find it hard with too many options. I mean how do you define a 2, 3 or 4-star photo? It is much easier to determine what photographs to delete, keep, and edit with a simple: reject, unflag, and flag system.
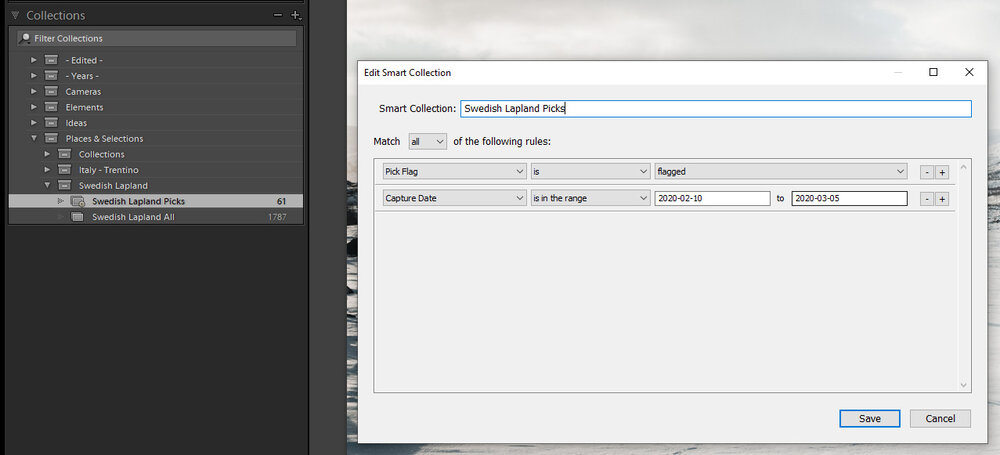
After importing new photographs to your Lightroom catalog. Create a new Collection Set with a name where the photographs were shot. Inside the set, create one collection with all the photographs from that shoot. Inside the Collection Set, make a new Smart Collection show the picked images after you have gone through all the images.
Note from a reader: When you have Caps Lock on, you don’t have to use the arrow keys to move between the images.
Adding Collections & Collection Sets in Lightroom CC Classic
Use the following smart settings: Match all
Capture Date - is in the range – "select the starting date and end date when you shot the photographs."
Pick Flag – is – flagged
Adding Smart Collections in Lightroom CC Classic
Note: If you had multiple photoshoots on the same day in different locations with different types of images. Use colors to define what you want to put in each Collection Set and add a rule to the Smart Collection: Label Color – is – "and choose a color for each shoot." Then you must add colors to the shots from the photo shoot.
2. Choosing photographs to edit
When taking photographs doesn't cost much, you shoot dozens of images from the same location and end up with hundreds if not thousands of images to go through. I often have a problem like this. Either I have too many photographs to go through, or I have too many similar-looking photos, but still, there are minor differences in them, so I don't want to get rid of any of them. What you can try to do in this situation is to go through all-new photographs and intuitively pick the images that are interesting to you. Don't spend a lot of time in the first pick. Go through the photos swiftly. Once you have set up the system in the first section of this tutorial, you can start going through the photographs.
Go to the Grid Mode with shortcut G and double click on the first image of the set. Use shortcut L twice to go to light out mode. Now you only see the current image with no distractions. Go through the photos with arrow keys, press either P, X, or nothing. Press X on the pictures that you want to reject and delete, rest of the shots that are ok, but not really anything worth of working on straight away leave unpicked. Use P to flag all the images that you find interesting and want to start editing. If you made a mistake, go back to the image and use shortcut U to make it unflagged.
Now that you have selected multiple photographs that you find interesting. Don't waste too much time figuring out what to work with instead choose one that pulls your interest the most based on your gut feeling. Remember, we are working with our intuition. If you find it hard to focus on an image, hide the filmstrip in Lightroom.
Lights Out Mode in Lightroom CC Classic (Shortcut L)
Note: You can change the colors of the background of the Light Mode from Edit > Preferences > Lights Out > Screen Color > Black.
3. Start the editing process
How to know where to start the editing process? I bet you have been in a situation where you have no idea what the first step in the editing process is. I have been uncertain about my edits many times. That's why Lightroom presets are so popular; they can give you a base to work. I guess we are used to doing things the easy way. Instead of using presets straight away, try to focus on the feeling you had at the moment you took a photograph. In this way, you have a solid base on where you can go with the edit. Having a clear goal of how you want an image to look is a great way to start the edit. No, I don't always have a clear picture in mind when I start an edit. And many times, the whole image might change in the process.
Here are questions you can ask yourself to guide the edit: How did it feel when you took the photograph? Was it cold or perhaps hot? What colors did you experience? What emotion did you experience? Was it dark or bright? What did you think when you captured the image? What do you see in the picture right now? What type of feeling do you want to provoke with the photograph?
Start by going through the settings from the basic settings always to color settings. Go with the gut feeling, and don't focus on rules, settings, or anything that might put you into a more analytical mind. Sort of feel the image and how it felt when you took it. Most of the unique edits come from a state of discovery and creativity. Not by editing to match the colors correctly using the histogram or by having the perfect exposure with no clipping and so on.
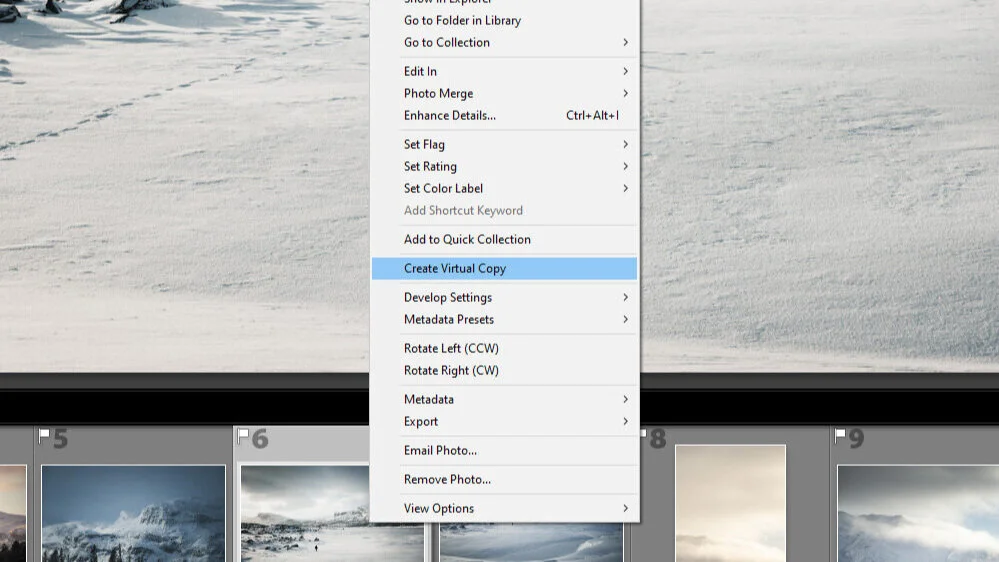
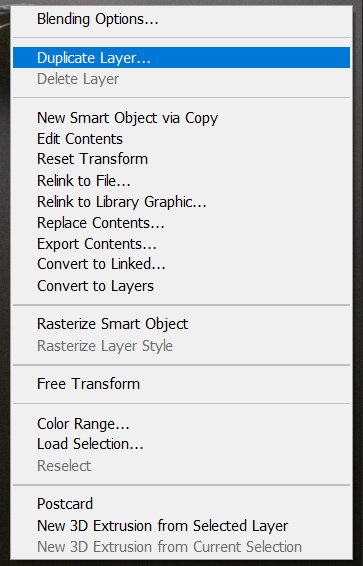
Once you have done an edit and you are not quite sure if you like it. Why not try it again and this time again feel if the image provokes emotion, or could you make an opposite edit? You can create a Virtual Copy and reset it and try again. You can make duplicates by right-clicking on the image and clicking "Create Virtual Copy."
Right Click to Create a Virtual Copy in Lightroom CC Classic.
4. Experiment with Lightroom presets
If you are stagnant and don't have a clue what to do with your photograph, start experimenting with Lightroom presets. Using presets is a great way to figure out what works for your photograph. For example, when I experiment with edits, I scroll through my Atmosphere presets and figure out if any of them suit the image. If I find one that looks good, I might tweak it and make a duplicate of the image with the Virtual Copy function and see if any other preset works for it as well. Usually, if the image is good, there might be plenty of presets that work with it. It's sometimes hard to decide which one to choose. In this process, I feel them out and then go with what feels best for the photograph.
I sometimes lose myself in the process of trying to perfect everything, and that will make me feel overwhelmed and lose interest in the picture I'm editing. I guess there are no rules that you can make to know when the image is ready. What I have found to work is to take breaks on the editing and then go back to the image and look at it with fresh eyes. You might catch something you never saw before the break. If you have done duplicate edits of the image, go through them with new eyes as well. I recommend looking at the individual edits once at a time and again use gut feeling to decide which one you prefer and want to share. Don't try to overthink the edits; instead, do the selecting part quickly.
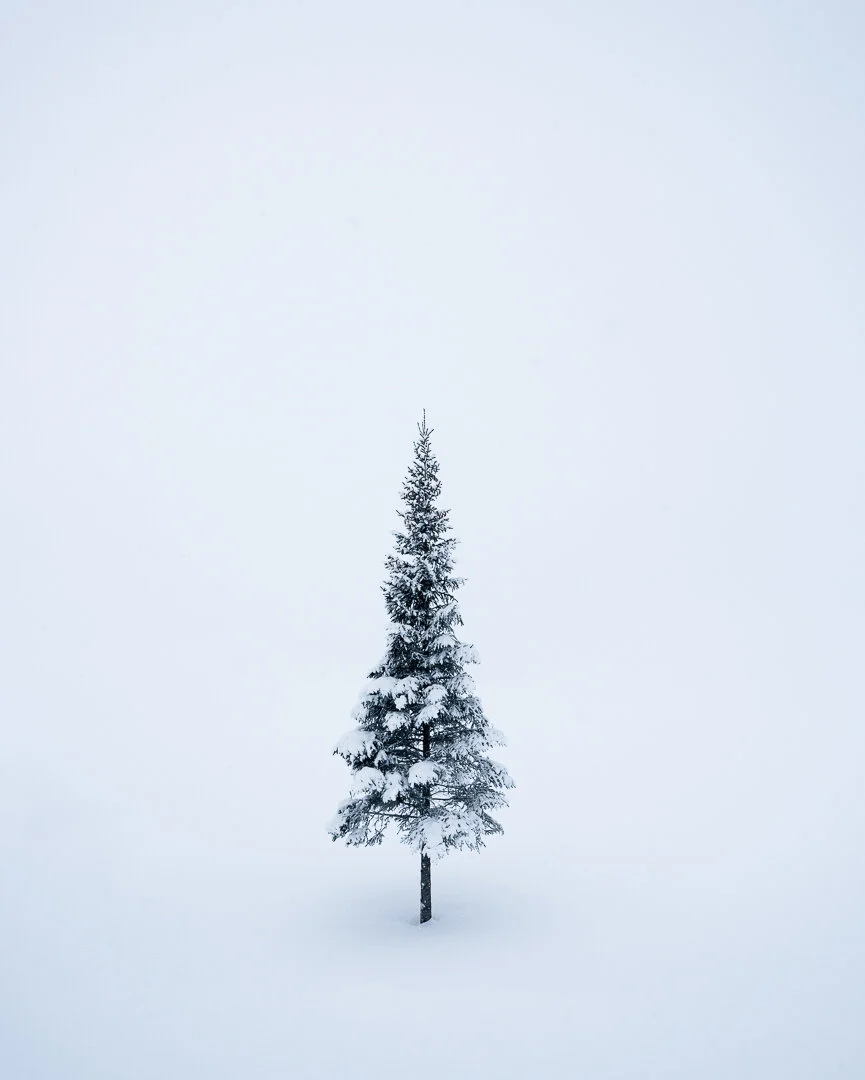
Desolation, Mikko Lagerstedt – Swedish Lapland – 2020
Alright, that's it. I think we covered a lot of things to consider when editing images. I hope you find the tutorial helpful! Let me know what type of process you have for your photographs.
GET THE LATEST CONTENT FIRST
If you like this post. Subscribe to be the first to receive fresh new tutorials straight to your inbox!
For my photographs, I use Lightroom 90 percent of the time so, it's not often I create photo manipulations, but recently I created a one because I felt inspired to do so. I guess it is a representation of hard times. Since the whole creating process is fresh in my mind, I want to share what goes into creating something like the final work from multiple images in Lightroom and Photoshop from sketch to the final work. As we all have more time in front of the computer, why not try to do and learn something new to stretch our abilities. I won’t go into every little detail of specific techniques; this is an overall look at how I create photo manipulations.
If you want to learn more about my techniques, check out my video tutorial Day to Night.
1. Creating a sketch
When I'm creating a photo manipulation, I usually start it with a blank paper in front of me and draw something that comes to my mind. I don't have any filters on what I should be creating; I start drawing from a vision I have. I sketch a rough idea and decide if it is something that I could be creating. I believe that when you have created the sketch, it's essential that you also take the next few steps on creating the work because otherwise, you might end up losing that momentum and vision you had in the first place.
Sketching tips
Start with a blank paper
Visualize how the final image would look like and start sketching
It doesn't matter if you can draw or not, as long as you know what you are creating
Don't be afraid to create multiple sketches
Make notes on the paper if you can't start building the image straight away
2. Selecting the images
I always start by creating a collection in Lightroom, so I have all the chosen images in one place. In this way, I don't lose my concentration whenever I go through the photos. If in the making process, I want to add another image, I can easily add it to the collection.
When I go through my photographs, I pick any picture that is anything as I had roughly sketched and visualized. Instead of going through all my images, I usually have a vision in which images could work together, so in this case, it was quite a quick process to find the pictures for the final piece. The only one that I had trouble choosing was the person in the frame. In the end, I chose one that was close to what I wanted to use and edited it later in Photoshop.
The images don't need to be perfect straight away. However, using similar photographs with horizons approximately in the same place and similar lens used to take the picture is a great way to minimize any problems later on when creating a photo manipulation.
Selecting tips
Select images with similar focal lenght
Use parts of the images to create the overall look
Visualize what type of images would work together
Select more photographs than you think you need to use in the final work
Using collections in Lightroom CC is a great way to have the selected images in one place.
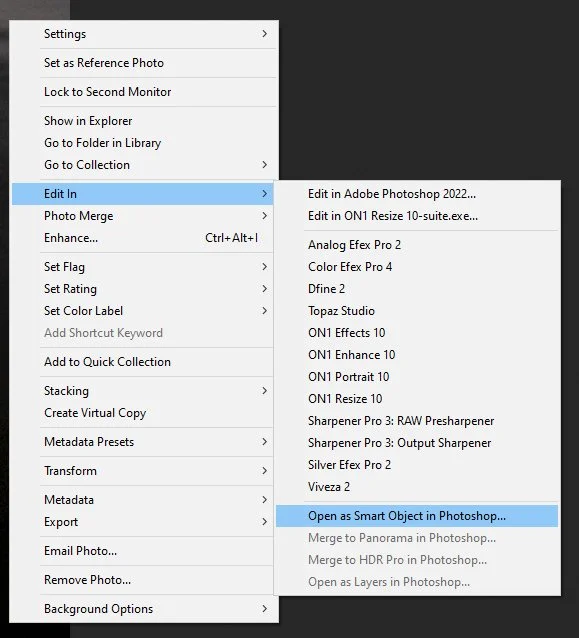
3. Creating the base
Once I have all the images I want to use in the collection, I open them as separate smart objects in Photoshop. I tend to use smart objects if I'm not sure what I want to do with the images in the first place. Or if I don't know whether the photos blend nicely. Smart objects are great when you don't want to sacrifice the editing abilities of the RAW files inside Photoshop. It makes your Photoshop files a lot bigger, but I still recommend using smart objects.
I then select each of the photographs and move them into one Photoshop file. As I have a rough idea of how I want the images to be placed inside the frame, I figure out if I need to make changes to the RAW files or if some of the photos won't blend well, and in that case, I need to select another one.
Once I have the images in the right places, I go back and forth between the pictures and change the settings to match them together by double-clicking on each image and editing the Camera Raw settings. It's a tedious job, but a crucial one to make your manipulations look more realistic. I use the road photograph as a base layer and as a starting point and try to match the other images with it. As I want the image to be quite dark, removing the colorful parts of the base layer is crucial.
Once I have all the images in place, I save the picture, and because the file size was going to be huge (11 GB), I used the PSB file format instead of TIF. The Lightroom CC Classic now supports PSB-files, which makes it easy to edit the file after you are done in Photoshop.
Why use Smart objects?
You can edit them inside Photoshop as RAW images
More flexibility to the edit
You can add filters to them without losing the ability to edit them
Smart object layers can be opened in Camera Raw by double clicking on the layer image.
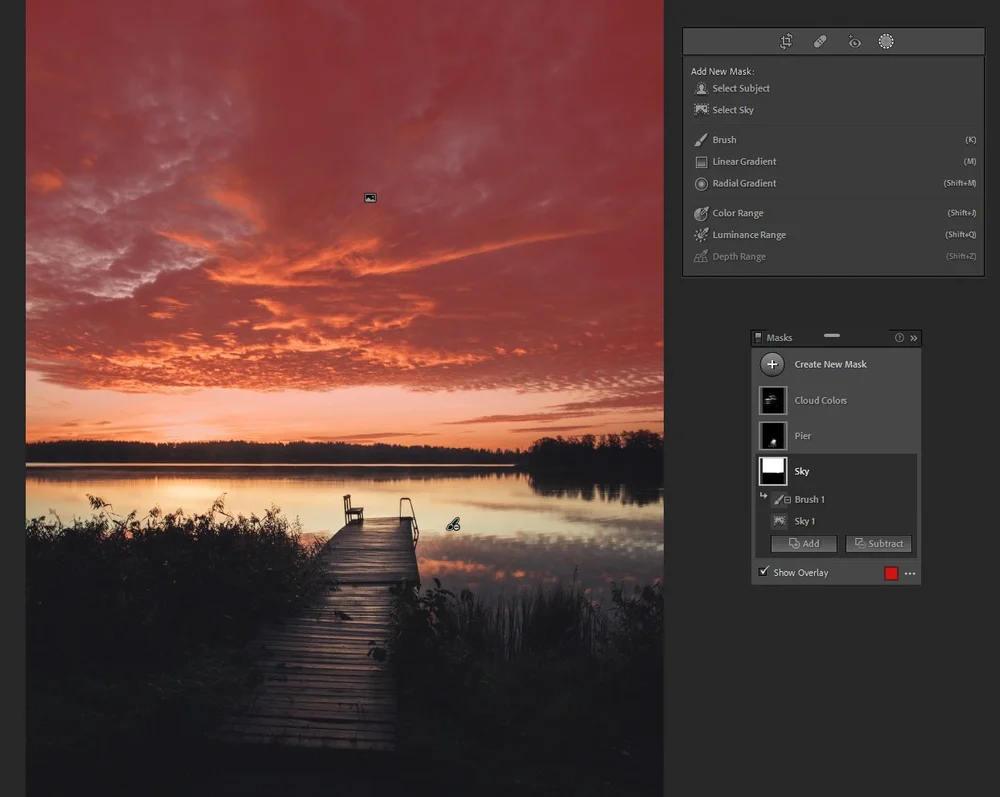
4. Masking
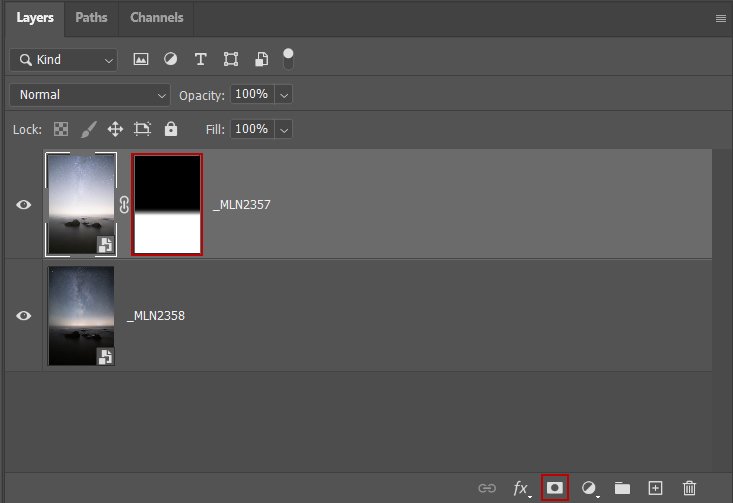
As the images start to look like they could fit together, I start the masking process. In the picture, I use multiple different ways to mask the layers. Most of the masking was done with brushes. First, I add a layer of fog, a shot I took at the lake to hide some of the branches on the side of the road. When I want to use only a small part of an image, I invert the mask with shortcut CTRL/CMD+I and start brushing with a soft brush with a low flow. When it looks decent, I hide and reveal the layer so I can see what it was before and after adding the fog layer.
Smoothening the background with another layer of fog by using soft brush and inverted mask.
For the cloud layer, I used multiple images to create depth and fluffy look. The cloud image was just a cloud in a blue sky, so it was easy to remove from the background. I used a cloud brush to create a mask with some soft yet detailed edges. I made duplicate of the cloud and rotated it so it would make it look much bigger and fluffier.
The look of the first cloud mask.
Making duplicates of the cloud layer and rotating them to make the cloud look more realistic.
After making duplicates of the cloud.
Masking tips
Use soft brushes to create smoother transitions
Invert the mask if you only want a small part of the image to be used
ALT-click on the layer mask to see how the mask looks like
If you have many layers as one object, add them to a group and mask the whole group to make final adjustments to the object
5. Creating elements
In these types of edits where, for example, I don't know how to do something, I google the effect I want to develop and try to learn new things. With the rain, I tried a couple of different tutorials. However, the rain effect was not as good as I wanted, so I created a set of brushes which I used to create the rain. I also added a rain cloud, which helped to create a more realistic look to the point where the rain starts from the cloud.
After adding the rain layers.
There were a few things I wanted to create, and one was the rain on the road. I wanted to create this feeling that the person and the raincloud had been moving together towards the horizon. So, it would look like the low part of the road was wet from the rain. First, I made a new layer and painted black with custom brushes to add some dark areas where I wanted and then added a layer mask as I wanted to have this rougher edge to the wet ground. As it started to look good, I set the blending mode of the layer to Soft Light to have this darker effect without being too overwhelming.
Using Soft Light blending mode to make the wet asphalt realistic.
After the added wet asphalt.
6. Adding details
When the road and the rain looked good, I added the figure. I wanted it to look like the person was walking in the middle of the rain, so I had to place it under the rain layer. When I want to create a detailed mask, I use the pen tool and take my time to go around the subject. As I had made the selection, I created a duplicate of the layer and flipped it vertically to create a reflection on the "puddle" on the road.
Final piece to the manipulation was to add the person.
As there were a lot of different things I wanted to create, I made a bunch of new brushes to create raindrops hitting the asphalt and the figure.
Using custom brushes to make the raindrops.
7. Final adjustments in Lightroom
When creating a photo manipulation, I usually end the edit in Lightroom. This time I spent little time going through different presets and used a one from my Atmosphere preset collection (Atmosphere – Down I). And after making a few changes in the preset, I added another preset (Atmosphere – Moon I).
Mikko Lagerstedt – Dark Thougths, 2020
And that's it — a dive into what goes into creating a photo manipulation from sketch to final piece. I hope you enjoyed the tutorial and if you want to see more of these leave a comment below, I would love to hear your thoughts. If you don't want to comment on the image, I would be interested in reading how you are coping with the situation we live in right now?
Stay safe, everyone!
GET THE LATEST CONTENT FIRST
If you like this post. Subscribe to be the first to receive fresh new tutorials straight to your inbox!
There are excellent guides where you can learn techniques and compositional rules in photography; however, there are not many guides that give you advice on how to create a unique style. That's why I decided to write this tutorial from the experience I have had in photography. I believe that anyone can create a unique vision and style, but it takes time and self-awareness.
If you don't know much about the gear you are using, I recommend you get familiar first with the tools you want to use in photography. Learning your equipment throughout and developing style are not necessarily things that go hand in hand, but I find it essential first to know how to use the equipment you have and then figure out a style as you progress.
1. Experiment
When you start to get familiar with photography, try to photograph anything and everything. Experiment with different subjects and styles. As you are experimenting, try to capture the subject in the most beautiful way you can. If it doesn't work out as you planned, then you find ways to improve. Maybe you want to capture a beautiful landscape with great depth, and you end up with a flat image. Analyze the photograph and see what might be the reason it looks flat and make notes. It's essential to be aware of how you would like your pictures to look, and with analyzing, it's easier to get better quicker and find your style in the process.
As you progress and have experimented with every photography subject, you start to gravitate to a way you want your photographs to look like and therefore create a unique style.
2. Find Real Inspiration
Don't follow anyone because of how many likes or followers they have. Gravitate towards real inspiration—photographers or artists whose work makes you feel something. When you look at their work and wish you had captured the shot, that's when you have found real inspiration. Focus on photography, not on the photographer. Back in the day, when I started photography, there were not many places that you could find inspiring artists. Therefore I never looked at someone's photographs and thought, "wow so many likes." I just focused on photography, nothing more. Detach yourself from the likes and comments, simply look at the work. The likes will come if you first follow your inspiration.
If you are reading this, maybe you enjoy the way my work looks, and you are already getting inspired by other photographers. However, it's essential to know what makes you enjoy a photographer's work. You can try and take something out of each photographer's work who inspire you and mix things and create a unique style. Don't copy anyone's work; instead, get inspiration and merge the things you find inspiring into your style. Remember that your style is always evolving, and you must grow and find new ways to motivate yourself, to keep on learning. Don't hesitate to go and find inspiration from painters, designers, or other artists as well.
Once you find inspiring photographers, find out if they provide tutorials and tips on how they took some of their work, and immerse yourself with that style for a while and you can see how it start’s to affect the way your photography looks.
Analyzing photography tips:
Ask yourself the following questions when you find an inspiring photograph.
What time was the photograph taken?
Where was it shot? Do you like the location, and why?
What type of technique was used?
What is the main subject?
What do you like about the colors?
What can you say about the post-processing?
How could you achieve a similar photograph?
If you want to create a list of inspiring photography/art/music, check out my earlier tutorial: Stay Inspired
3. Practice with intention
As you have learned something out of someone who creates inspiring work, it's time to put it in practice. You can read books, watch tutorial videos all the time, but if you don't put it in action, it doesn't work. You have to put in the hours. Pick a subject and focus on it with intention. If you are internally motivated to photograph, you can easily spend days photographing before getting bored.
Try out different equipment, focal lengths, and settings. If you have a limited budget as most of us do when we start the art of photography, lend a new lens or camera and try it out. If a particular look inspires you, maybe it's shallow depth of field. Go and find a lens to get that look and try it out and see if you can create those types of shots.
4. Challenge yourself
As you get better and better, try and challenge yourself, and create daily challenges that inspire you to try out new ways to photograph. Here is a list that helped me to create unique work.
Photograph a day with only one lens
Create one exciting photograph today for yourself
Learn a new style of photography each week
Take pictures in bad weather
Take photos in the middle of the day
Use a long exposure to create a different look
Use the rule of thirds to capture a landscape
Capture low light photographs
Capture images with the following subjects
Reflections
Landscape
Waterscape
Motion
Lines
Stars
Color: blue, red, orange
Mood: dark, bright
You can create as many as you want and check them off and move to the next one.
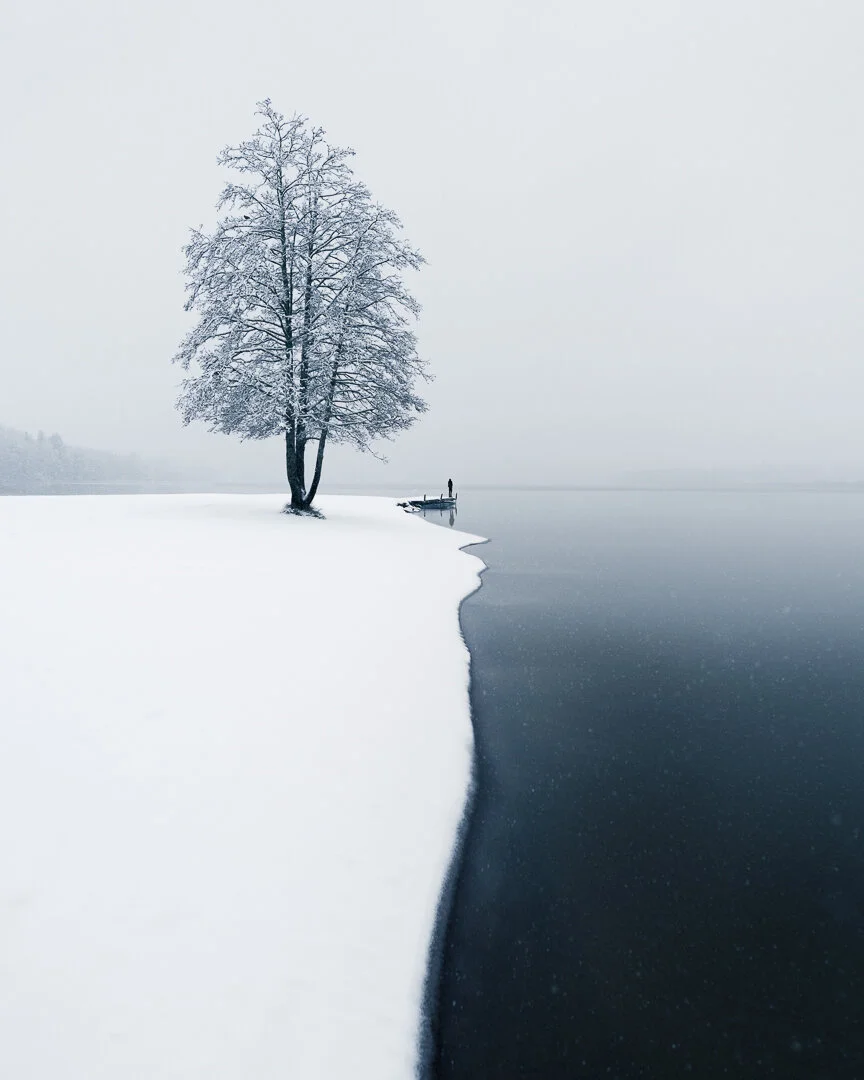
Spring in Finland I, 2020 – Tuusula, Finland – Mikko Lagerstedt
Spring in Finland II, 2020 – Tuusula, Finland – Mikko Lagerstedt
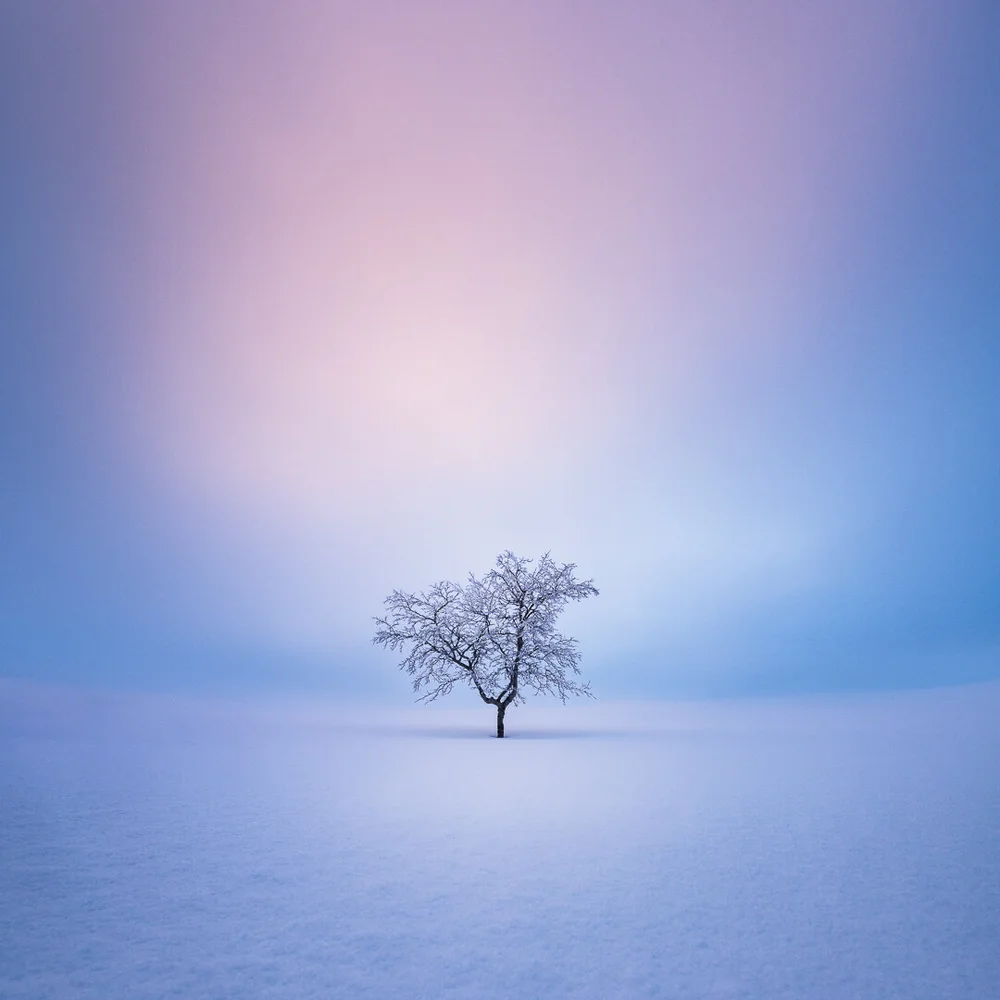
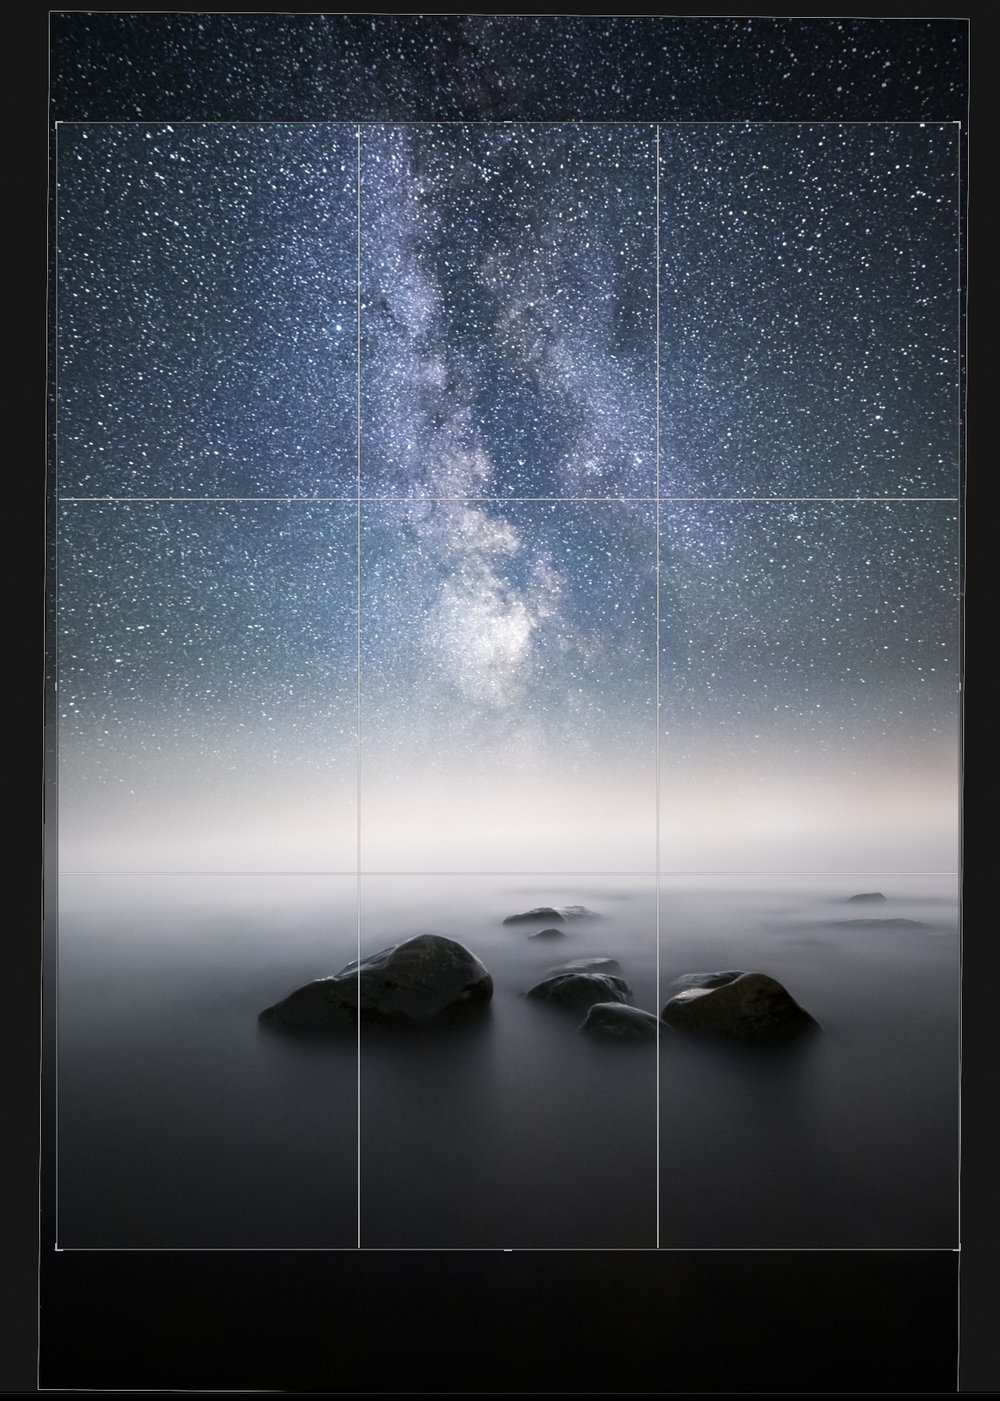
Isn’t it funny how a view can change in a matter of hours? Both of the photographs above were taken a few days ago. Talk about Spring in Southern Finland. The first one taken earlier when it was rather warm and the second the day after when it had snowed a lot. Snow has since melted and it’s starting to look like a real spring again. Both were captured with the Nikon Z7 and Nikkor 14-24 mm f/2.8 with a 10-stop filter. Edited with the Atmosphere preset collection.
On a side note: about a year ago, I found myself uninspired to create photographs. I'm writing about my experience and how I finally learned to overcome my creative rut—a guide on how to reignite your love for photography. If you are interested in this guide, let me know in the comments down below, so I'll then know if I should keep writing and share my knowledge with you.
I hope you enjoyed the tutorial. Stay safe, and take care of one another!
GET THE LATEST CONTENT FIRST
If you like this post. Subscribe to be the first to receive fresh new tutorials straight to your inbox!
I love to capture minimalist photographs, and it often comes naturally to me. A Zen-like view is more pleasing to my eye than a whole lot of mess in the frame. I always search the scenery to look for the main subject and how I could frame the composition so it would be simple and beautiful. In this tutorial, we go through five tips on how to create minimalist landscape photographs. Aesthetically, minimalist photography is a purified form of beauty. It is a representing of order, simplicity, and harmony.
1. Simplify the view
When you want to capture a minimalist photograph, focus on what you want in the frame and what you do not want. Find the focus point or subject and then try to frame it so that the other elements do not obstruct or distract the eye. It is easier said than done, and sometimes it is not possible. However, as you practice framing, you get better at it and find ways to create space between the elements.
Crop out anything that is in the way of the subject. Find different perspectives to have fewer distractions. Walk around the subject and find the perfect spot to take a photograph. If it's not possible to get a clear view of the subject, and the subject is something you want to capture, you can use Lightroom to get rid of some of the elements you don't want to see in the final photograph.
Mikko Lagerstedt – Solitude – 2018
2. Equipment for minimalistic views
With different equipment, you can simplify and create harmony in the photograph. Use a telephoto lens to simplify a landscape and isolate the subject from the foreground. When it is foggy, try to emphasize the view by capturing the landscape with a wide-angle lens and a tiny subject. I use a 14-24 mm f/2.8 lens to capture those wide views.
Often, it can be hard to capture a grand landscape view. Search for interesting foreground elements, and if you see something interesting, you can use a shallow depth of field to capture the subject and thus create a minimalist photograph. Using 50 mm with f/1.4 or 85 mm f/1.4 lens gives you a great shallow depth of field.
Negative space, in photography, is the space around the subject. Using negative space is a great way to create a more minimalistic view. If it's a cloudless sky, try to tilt the camera, so you have a wide-open sky with a tiny subject. Mist and fog give the perfect opportunity to use negative space in photography.
You can use darkness as negative space and light up the subject or have a light around the dark subject.
A great way to create minimalistic photography is to capture the image in a time where the light hits the subject just right or when there is mist. Photographing in fog or mist is a fantastic way to isolate a subject and find minimalistic compositions. I love to capture fog and often go out when I know there will be a possibility for some foggy views. When you want to have a great contrast between the elements, you can go out at night.
If it’s snowing a lot, go out, because it is the perfect opportunity to isolate subjects and create simplistic photographs.
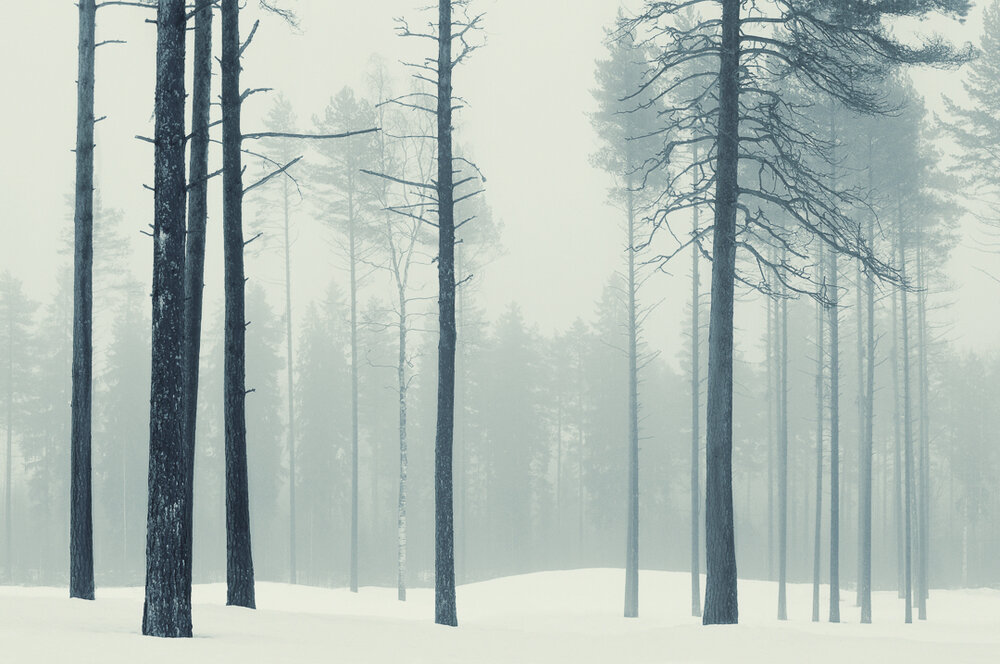
It's not always necessary to have the simplest landscape in a minimalist landscape photograph. Instead, use nature's patterns such as trees to create a pleasing and harmonious landscape photograph. Threes and fog go well together.
Mikko Lagerstedt – Harmony – 2010
Mikko Lagerstedt – Patterns – 2015
GET THE LATEST CONTENT FIRST
If you like this post. Subscribe to be the first to receive fresh new tutorials straight to your inbox!
For the past month, I have been using the BenQ SW321C -monitor. And I have to say that I have been pleased with the display so far.
So far, I have been impressed by how good the display is. When you get the box, you can sense that it is a top-quality product. The box is enormous; no wonder it's a 32-inch 4K monitor.
The BenQ has a LED backlight IPS-panel with a high gamut covering 100% sRGB, 99% AdobeRGB, and 95% DCI P3 color space. The panel has a special coating that makes it lightly matt, reflections are minimal, making it perfect for even brighter rooms. The screen comes with shading hood parts; you can easily install to make the reflections disappear. There is a roller for cleaning the screen, which allows you to keep the screen's surface perfectly clean.
The monitor is heavy, well designed, and the movements are fluid despite this very large monitor's size and weight.
BenQ SW 321C without the shading hood
You can quickly select between Adobe RGB, sRGB, and B&W with the included Hotkey Puck G2. With a button press, you can set your monitor to the sRGB colorspace or Adobe RGB, which is an extremely useful function when you publish a lot on the internet.
BenQ Hotkey Puck G2
The box includes
What you get in the box: Everything. No, but really, there is everything you would expect and more.
Instruction manual
Shading hood parts
Power cable
HDMI, DisplayPort, and USB -cables
Hotkey Puck G2
Screen cleaning roller
Software (CD)
Connections
The connections are fantastic, including USB type-c. With the new 2020 13 inch Macbook Pro, I can easily use the USB type-c to keep the laptop charged. So easy and convenient. I use the display with the desktop computer with the DisplayPort connection.
2 x HDMI 2.0
DisplayPort 1.4
USB Type-C
2 x USB 3.1
SD Memory Card Slot
3.5 mm Audio Out
BenQ SW 321C with the shading hood
Colors & Sharpness
Even out of the box, the colors look accurate. Covering 100% sRGB, 99% AdobeRGB, the panel is fantastic for photo editing. Of course, I recommend you calibrate the monitor before starting to work with it. The display includes hardware calibrating, which means it won't affect the graphic card while adjusting the colors. I use X-Rite i1 Display to calibrate my monitors, and after the calibration, I can say that the display looks even better. The contrast and sharpness are both perfect for photo editing.
BenQ SW321C includes hardware calibration. I use the X-Rite i1 Display calibrator.
Paper Color Sync
If you print your photographs, you can take advantage of the Paper Color Sync technology. Download and install the free BenQ Paper Color Sync software on your computer and select your printer and the paper you want to use from the drop-down menus. This little tech makes it easy to match the photograph on-screen to your desired printing paper.
Conclusion
The BenQ SW321C is unquestionably a monitor that many photographers have been waiting for a long time. You can count me in that group as well. A 32″ 4K quality panel with great features at this price is difficult to find. Luckily the BenQ delivers. The anti-glare coating, panel uniformity, and ergonomics are all superb. With excellent color coverage, I can easily give it a 5/5 rating. Highly recommended for a professional photographer or advanced hobbyist. For me, it's a perfect display. Either if you share my work on the internet, or if you print your work, the monitor performs well for both tasks.
Pros
Excellent image quality
BenQ Puck G2 is perfect for switching between color profiles
Hey everyone. I hope you had a wonderful summer. I wanted to write this post for a long time, and finally, I have some energy to do it. It’s been a long summer and quite difficult for me. In May, I felt that I needed to take a break from photography, as the Spring season is not really inspiring to me. I went out to photograph, but the weather was just blah, so I called it and took a couple of weeks off.
As I started to photograph again in mid-June, I started getting strange pain in my left leg. It was really mild at first, and I just thought I needed to rest. As time went on, it got worse, and in late June, I went to see an osteopath for three times, but it didn’t work, so in August, I went to see a doctor. The doctor diagnosed a nerve problem in my back with a possibility that I have a bulging disc. She sent me to physiotherapy.
After my first physiotherapy session, things seemed to get better, and I got some pain relief. The next week the pain went back and forth. One day it would be mild, and the other was really bad. I couldn’t stand for more than 10 minutes before I got pain going from the lower back to the left side of my feet. There was no consistency in what I had done the previous day to make it better. It just was random.
Two weeks ago, on Sunday, my lower back was really stiff, and I thought it would be fine the next morning. But I couldn’t have been more wrong. The next night I woke up in the middle of the night with severe pain on the left leg and lower back. I tried sleeping, but I couldn’t find a way to put my body to get any relief in pain. It was something else. I took some painkillers and hoped for the best. I finally fell asleep after four hours in bed. In the morning, I woke up and tried to get up, but I couldn’t. The pain was so bad that I couldn't do it even when I tried to crawl.
I called the doctor, and she told me to get stronger painkillers. My wife was kind enough to deliver them to me. Later that day, I barely got out of bed to walk. I couldn’t walk straight. My body was fully twisted to the left. Finally, the meds helped me get some sleep. It was a struggle the whole day and night, but since I had no problem peeing or no muscle weakness, the doctor told me to stay home and try to move and walk. I did what she told me, but on Tuesday, I could barely get out of my bed, and then I realized that my left calf muscle was not responding, and I couldn't walk normally.
I called the doctor, and she told me to go to the emergency. As my wife was driving me to the hospital, my left leg started to get numb. I couldn’t feel my butt. The pain was excruciating. I got straight into the surgery ward. The next day I got a CT-scan, and they confirmed the bulging disc on my lower back. After a long couple of days, on Friday, I had a successful surgery. Immediately after the surgery, the leg pain was gone.
It has now been a week after the surgery. I write this from my bed. My left leg still has some problems; the calf muscle is partially numb, and so is my pinky toe and heel. I can walk, but it’s not easy. I try to walk as often as possible to keep getting better. I still have 7-9 weeks of recovery to get fully back on photography. Since I can’t lift heavy or do any necessary movements, landscape photography is not an option. I hope to get back on my feet and start doing what I love to do.
I’m forever grateful for the hospital staff in HUS and for my lovely wife for the support, caring, and helping me along the way.
I want to also thank everyone who has supported me by buying my prints and tutorials. Thank you!
Meanwhile, you are waiting for new content, you can find my tutorials, eBooks, and more from the Learn-page and my prints are available through the Printshop.
Here is a photograph I took in August, one foggy night. It wasn’t easy to capture it with the problems I had, but I’m glad I went out that night.
Midnight Light - 2020 - Edited with Atmosphere preset collection
Hey everyone! Since my back surgery six months ago, I haven’t been able to photograph much, but I’m getting better slowly. While I have been more inside than out, I have been working on a system that will boost your creativity while editing your photographs. We all struggle with creativity and finding inspiration for our photography, and that’s what got me started with the EPIC System. I wanted to create a solution for those moments when we lack direction with our photographs and editing.
The EPIC System covers every aspect you need in post-processing. From overall look to fine adjustments, from subtle to intense effects. It’s all there, and it’s made so that you don’t have to spend hours editing your images.
Here is what people are saying about the EPIC System
“I love that I can get amazing yet natural results with the EPIC collection. I personally don't like over-edited photos and often find 'regular' presets too limiting, so the EPIC collection is a perfect tool for me. It's a step-by-step editing setup, making it easy for beginners and advanced users alike to take every picture to a whole new level - with only a few clicks.
If you do not want a preset that basically only allows you to recreate somebody else's look but a system that gives you absolute freedom in creating, then the EPIC collection is a must.”
The presets are the complete package! They are straightforward to understand and allow you to work through the editing process methodically. At the same time, working through each part gives the photographer much flexibility and scope for individuality and creativity.
How does The Epic System work? A step-by-step guide:
Select an EPIC base preset that you want to use for your photograph
Find a setting preset that suit the style you want to achieve with your image
Apply Filter presets. These help you to balance or imbalance your image and apply effects to different parts of the image.
Select a color styling with the overall color presets.
Apply color grading to suit what you want for your image
Effects presets let you fine-tune the settings applied to your image.
Final adjustment presets give you powerful adjustments to finish the edit
EPIC Extra presets give you experimental adjustments to play around with.
EPIC Color Profiles is a set of 30 different Color Profiles to give your image that final styling and effects.
The cool thing about the System is that you don’t have to use all these steps, and you can start your editing from any of these steps. Find out more about the EPIC Preset System.
Happy weekend everyone! I released the EPIC Preset System last week, and I’m so happy how people have responded to the release. I originally edited this image with the preset system but I wanted in this week’s tutorial, show you how you can achieve the following color transformation inside Lightroom without the EPIC Preset System. The only thing you will be missing is the Color Profile (Control) added to the final image.
You can follow along with the video, or use the text version below to recreate the effects! Enjoy.
Not many understand the power of the Calibration panel that’s why I have included calibration presets in the EPIC Preset System.
Red Primary Hue + 40 Saturation – 19
Green Primary Hue + 72 Saturation – 59
Blue Primary Hue – 100 Saturation + 22
Color Profile
To finalize the edit, I used an EPIC Color Profile – Control. I love to use these Color Profiles to create final adjustments. They are so versatile and effective; I just love them.
And finally, here are the before and after photographs.
Hey everyone, I hope you are doing great! This time, we are talking about color profiles and how they can immediately change the way you edit your photographs in Lightroom and Camera Raw. If you don’t know how to use or create one or, better yet, don’t know what a color profile is, keep reading.
It's been about three years since Adobe released the color profiles for Lightroom and Camera Raw. I think they are one of the most overlooked parts of Lightroom editing, but they definitely shouldn't be. I use them daily because of the versatility they provide.
What is the difference between presets and color profiles?
Color profiles and presets are pretty similar, and you can create them the same way inside Photoshop Camera Raw, but there is a difference. Color profiles apply additional settings to your image. For example, suppose you use a preset on your photo and feel that it's missing something. You can then select a color profile, and it won't affect any of the already used settings. And the best part is that you can adjust the effect you want on your photograph with the amount slider.
Another notable difference between the two is that you cannot create a preset using Photoshop adjustment layers. However, you can do that with color profiles. It's a game-changer! I created most of the 30 EPIC Color Profiles inside Photoshop for the EPIC Preset System.
What are the pros of using color profiles?
Opacity/amount slider to fine-tune the profile effect
Thumbnails to see the outcome before using the profile
Additional effects and it does not affect presets or anything applied already to the image
Can be created using Photoshop adjustment layers
It's not possible to create color profiles inside Lightroom at the moment I'm writing this tutorial. So we are going to use Photoshop and Camera Raw to create one.
How to create color profiles in Camera Raw (quick guide)
Open a RAW file in Photoshop Camera Raw
Adjust the settings of the image (do not change temperature or exposure)
ALT-click on the create a new preset icon in the preset panel
Name your preset and group it with a new group
Select the settings you changed
Deselect Camera Profile
Tone Map Strenght: Low(Normal)
Deselect Look Table
Click OK
Open Photoshop and open a RAW file.
If you don't use a RAW file, go to Filter -> Camera Raw Filter.
You can create a color profile just like you would create a preset.
You can also use your favorite preset and then create a profile from it. Note that not all settings can be applied to color profiles. You cannot save calibration settings, for example.
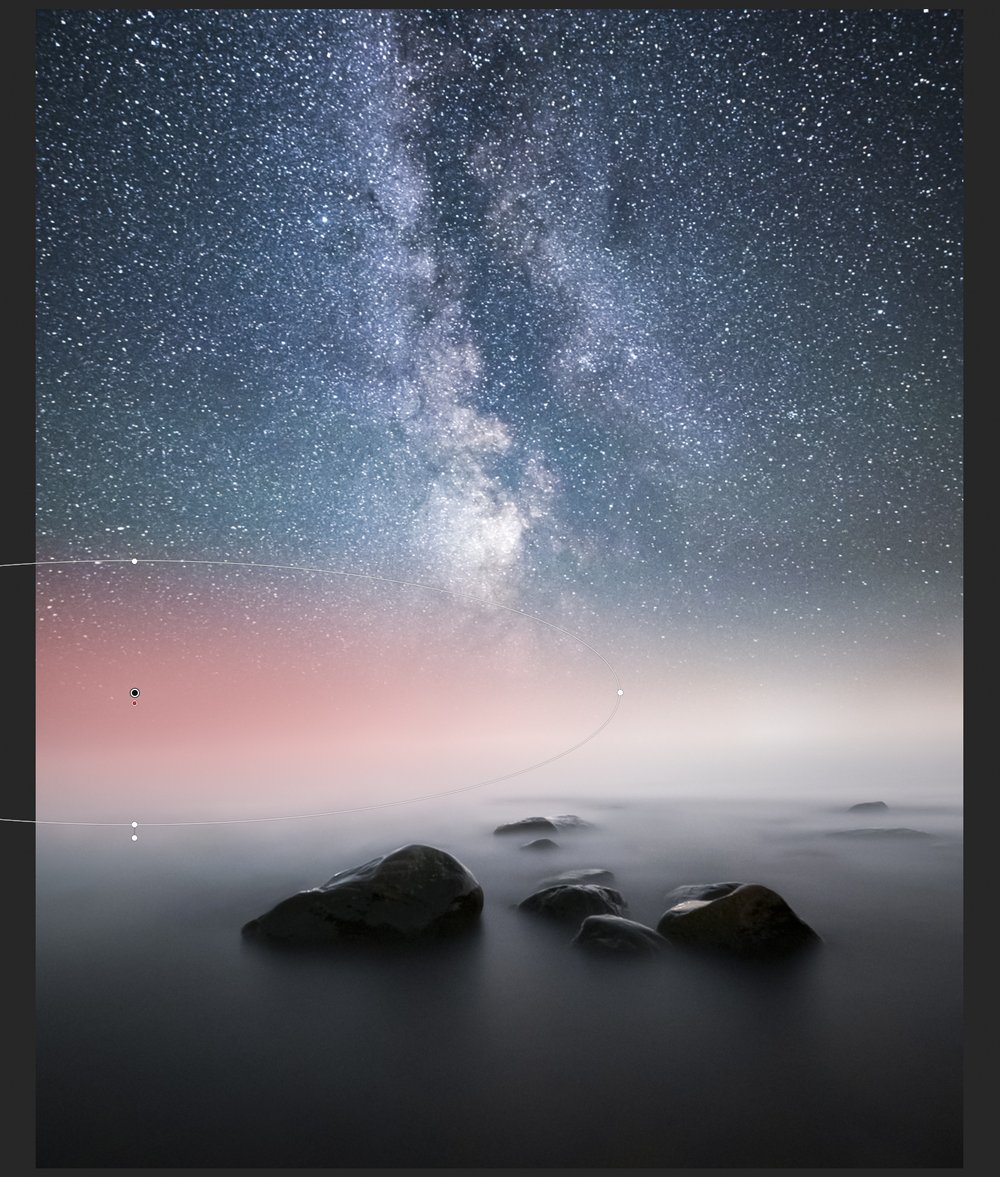
Let's create a profile for a night photograph. The settings depend entirely on the photo you want to edit and what style you want to make. These settings might not work on heavy light pollution images.
You can make the adjustments in Lightroom and then go to Camera Raw and paste the settings to the image and create the color profile. However, because the two programs are so similar, I recommend doing everything in Camera Raw. This way, you don't need to use two different programs and remove the unnecessary step.
Start by making changes to the settings. Do not touch the temperature or exposure sliders unless you want to create something funky. These will affect the outcome and probably won't work on many photographs when applying the color profile.
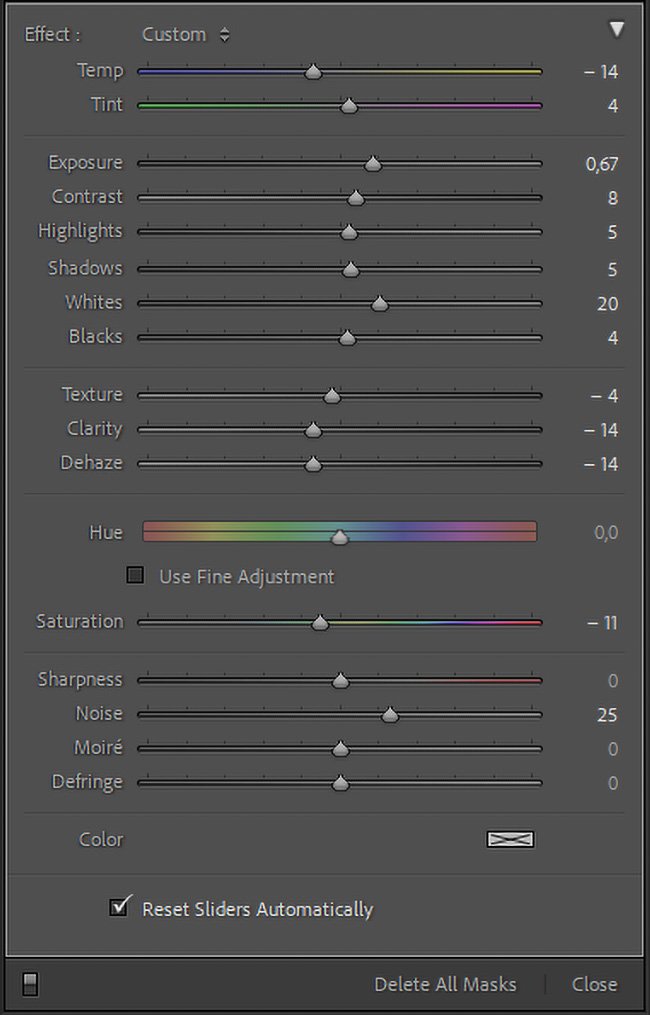
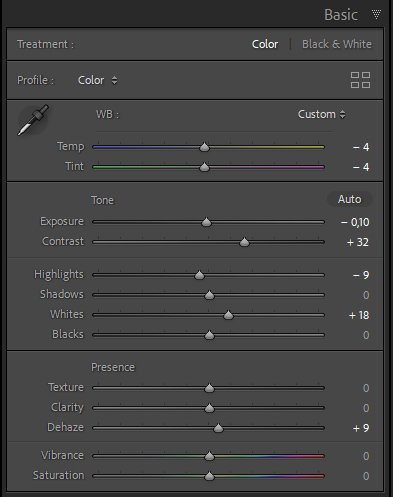
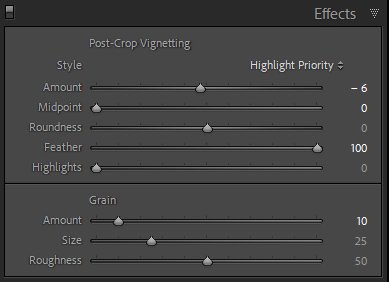
Settings for a Night Photography Profile
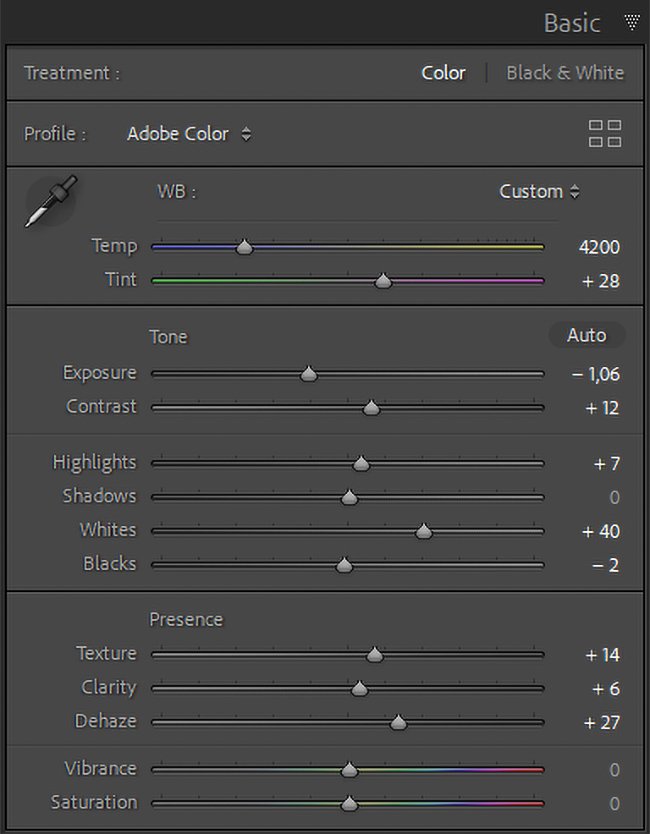
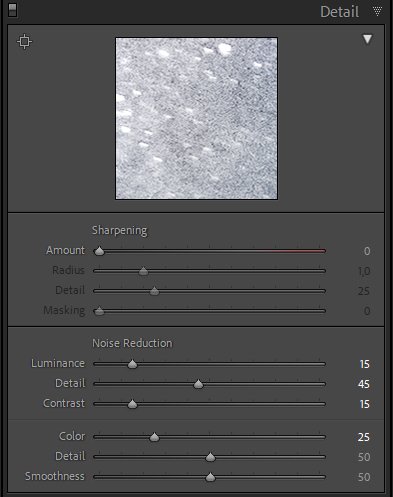
For this night photography color profile, I used the following basic settings:
Contrast + 54 To make the stars pop, we need to add contrast.
Highlights – 63 Usually, highlights are too bright in night photographs that’s why we need to decrease those quite significantly.
Shadows + 23 Let’s boost shadows so we don’t darken the photo too much.
Whites + 15 Adding whites increases the white point and so the stars are brighter.
Blacks + 28 Just as boosting shadows, we need
Clarity + 14 Dehaze + 7 Saturation – 10
Dehaze and clarity work wonders on star photography. But by adding dehaze and contrast, you also increase the saturation; that's why I recommend decreasing the saturation.
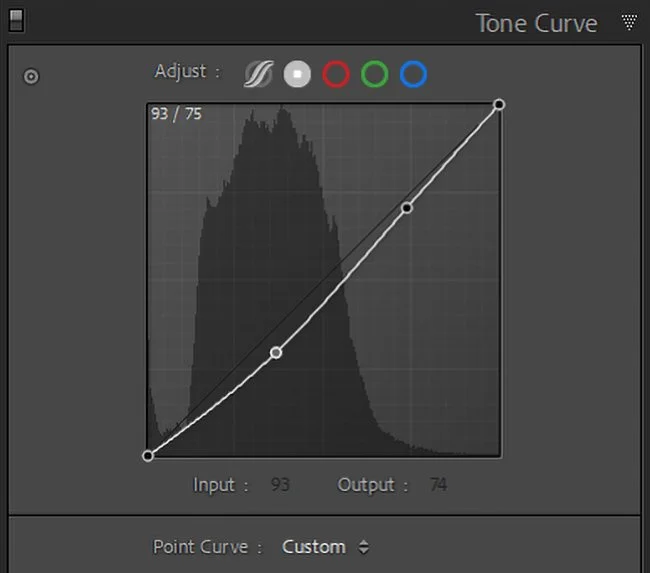
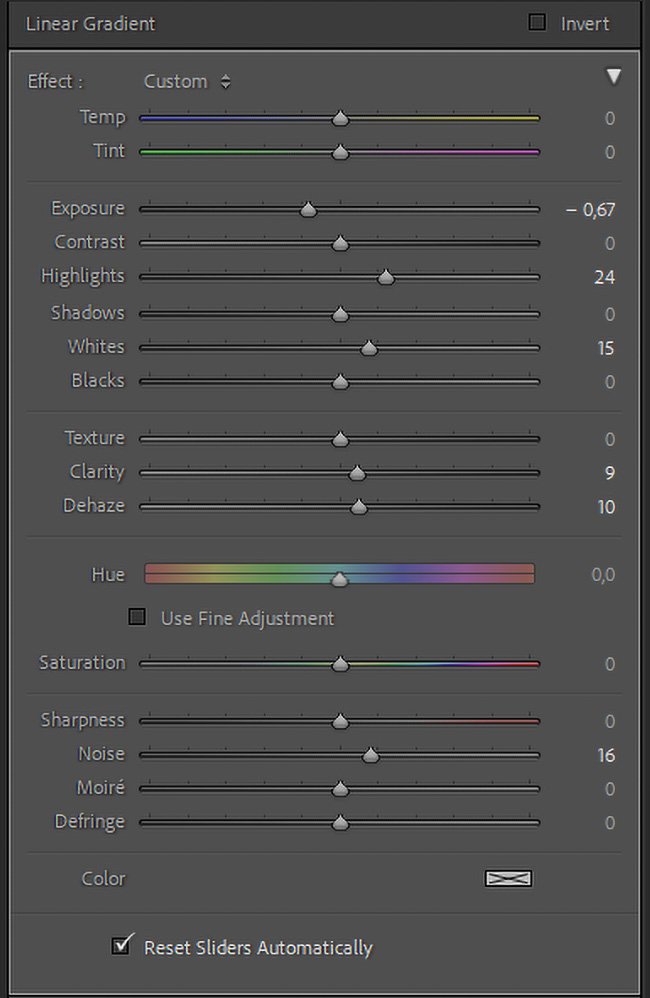
The next step is Tone Curve. Let's add a subtle S-curve to the tones and move the black point slightly upwards.
Basic Settings for star photography
A subtle s-curve in Curve Adjustments
For the sake of the tutorial, I want to keep the settings quite simple yet powerful. Let's keep the color settings intact.
Creating the color profile
Now go to the Presets tab and ALT-click on the Create a New Preset icon.
Go to Presets (SHIFT+P)
ALT/Option-click: Create New Preset
I have found the following settings work best for most profiles and photos:
Name: Boost Stars
Group: New Group (I used Night)
Uncheck Camera Profile
Select Basic
Select Point Curve
If you made any changes to the colors, also select them.
In the Advanced Settings, use the Low (Normal) Tone Map Strenght
Uncheck the Look Table
Click OK
Save the color profile with settings you want to experiment
And that's it; you have just created a color profile! But where can you find it?
Close the window, or if you want to use Camera Raw, go to basic settings. Next to the profile, click the three rectangles and a magnifying glass. Here you can find your new profile. If you can't see the thumbnails click the three dots on the right side of the profile and View: Grid.
You can find the color profiles in Lightroom CC and CC Classic in the same place. In Lightroom Classic, click on the four rectangles.
Basic settings > Profile browser
Amount adjustment in Lightroom
Now the profiles are ready to be used. You can select a profile and use the Amount slider to define how much it affects the photograph. Easy and quick!
If you want, you can download the color profile for free and add it to your color profile catalog. Here is how to install color profiles:
Installing Color Profiles in Lightroom CC
Open Lightroom CC
Open edit menu (shortcut E)
Go to Profile browser by clicking the three rectangles
Click the small dots and Import Profiles
Find the profile XMP or zip file and click Import
Installing Color Profiles in Lightroom CC Classic
Open Lightroom CC Classic
Go to Develop Module
Click on the Basic Settings tab
Click the four small rectangles to go to the Profile Browser
Click the three small plus sign and Import Profiles
Find the profile XMP or zip file and click Import
Installing Color Profiles in Camera Raw
Open Camera RAW
Go to the Preset menu by clicking SHIFT+P
Click the small dots and Import Presets and Profiles
Find the profile XMP or zip file and click Import
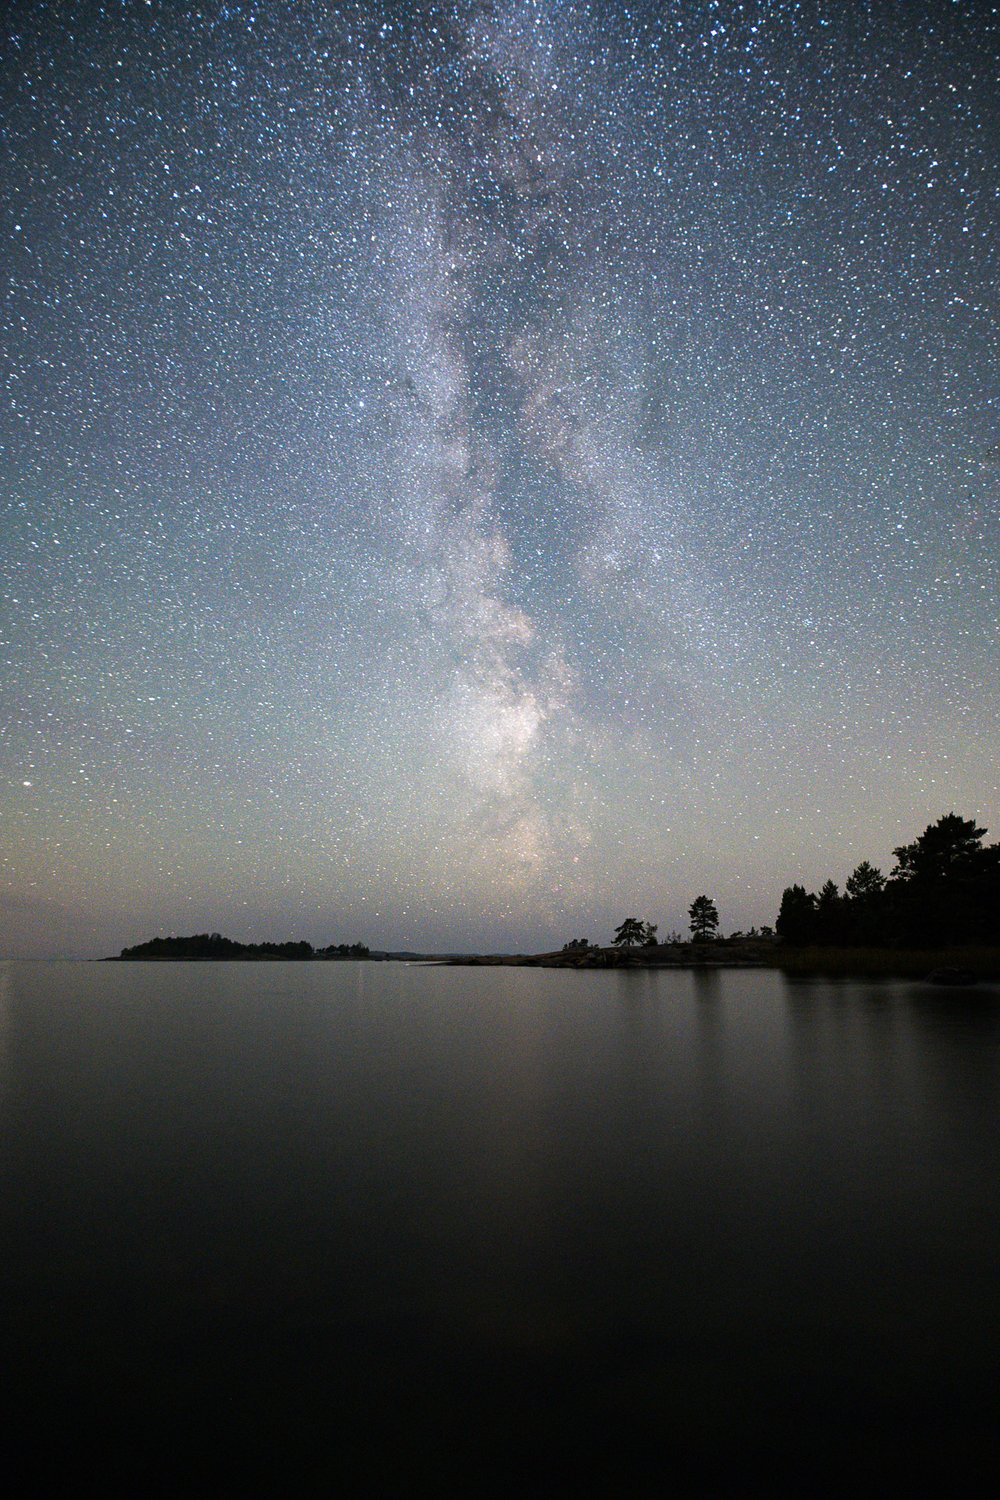
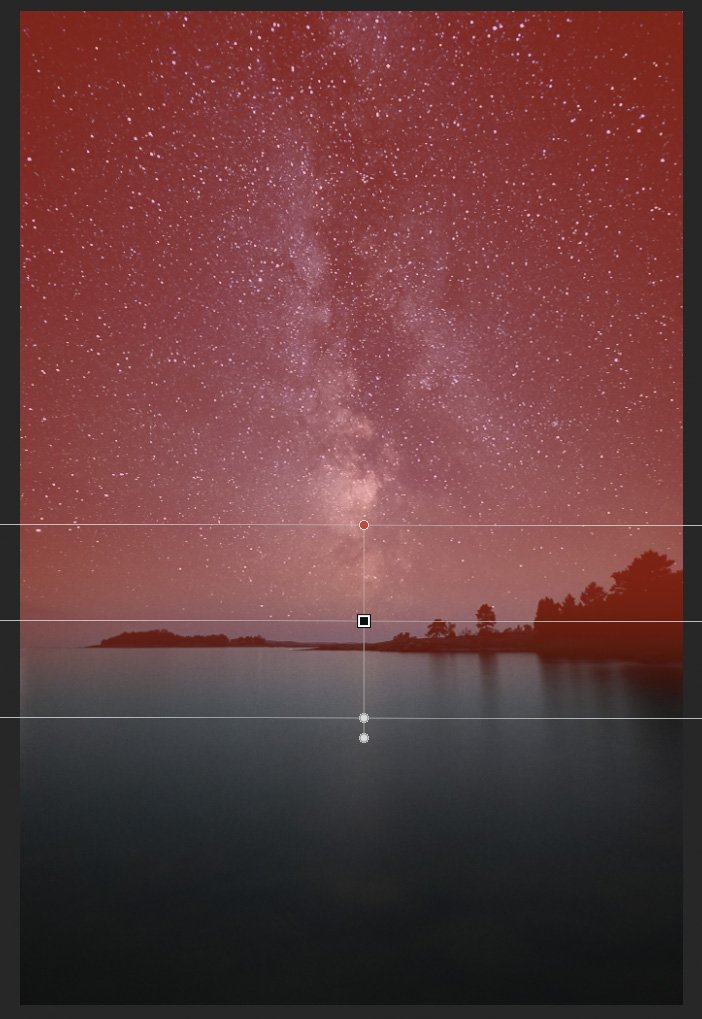
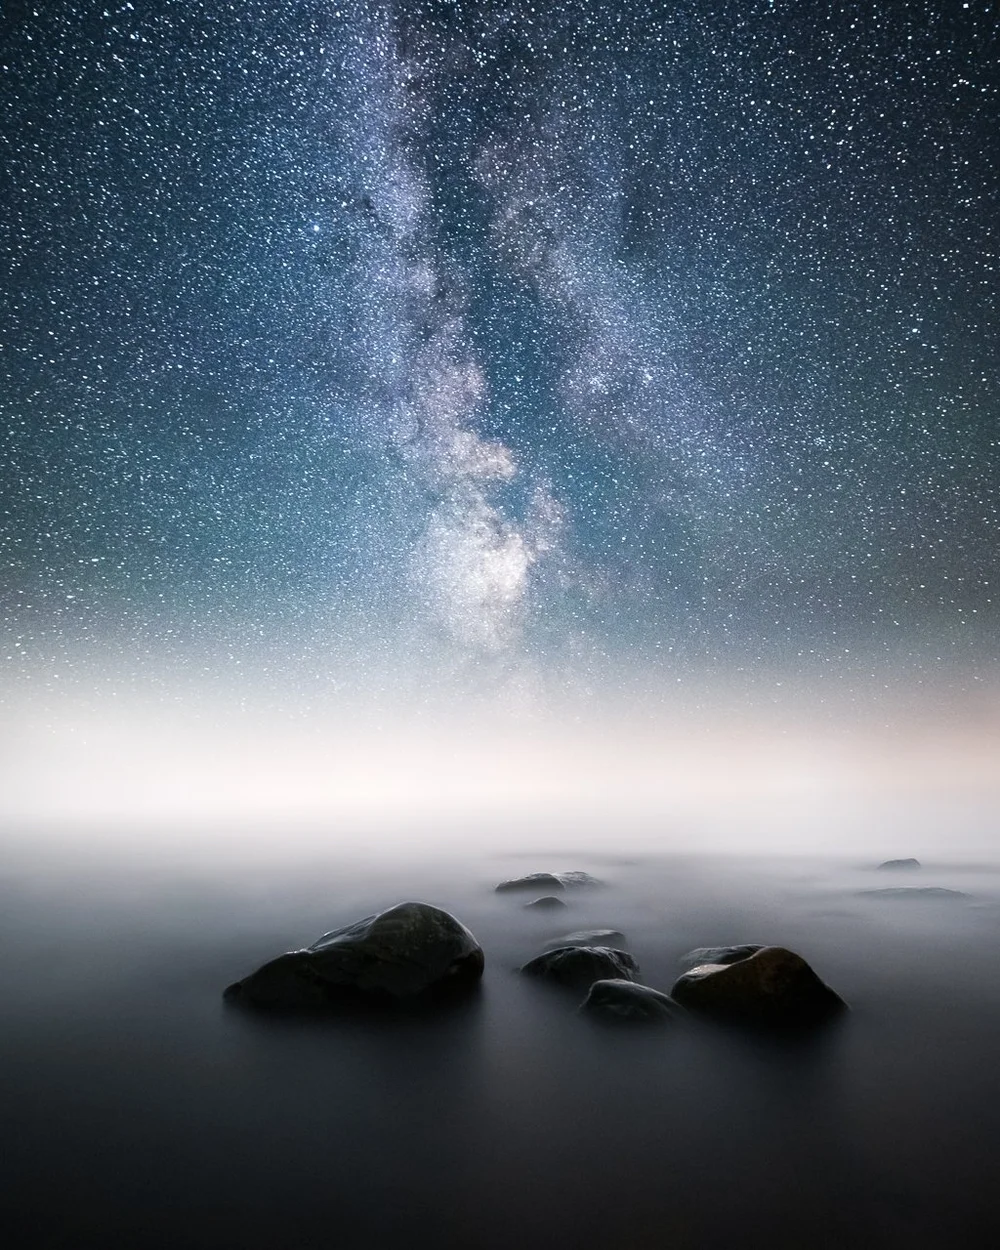
Here is the before and after our boost stars color profile at 100%.
Before
After
I used Destination preset to edit the image before applying the color profile from the EPIC Preset System.
Thanks for reading; I hope you enjoyed the tutorial! Until the next one.
GET THE LATEST CONTENT FIRST
If you like this post, subscribe to be the first to receive fresh new tutorials straight to your inbox!
I originally wrote this guide before my back surgery last autumn. It’s a self-development guide for creatives who want to create more and inspire others. How to get out of a creative rut and reignite your love for arts. First, I thought I would make an eBook out of it, but as I don’t want to spend hours editing a book, I’ll share it here on my blog. Enjoy, and as always, you can share and comment on it if you find it useful. It means the world to me!
In this guide, I will go through the things that have helped me overcome a lack of motivation and reignite my love for photography. I have been severely affected by a lack of inspiration and motivation towards photography in the past. It hit me sometimes hard, and other times it just lingered in the background. Finally, I have learned the steps that have helped me to overcome creative rut and get back my internal motivation. In this guide, I walk you through each step of the way to find motivation, creativity, and enjoyment in photography.
I have been a self-development enthusiast for the past seven years, and it has been hugely beneficial for me in search of my inner motivation in photography. I have tried many different things, and in this guide are the ones that work for me and for photographers I have interviewed who have gone similar paths.
In this guide, I don't just brush through motivation as something that is outside of you. Instead, we go deep in self-development and how to find your way through the other end—hopefully more inspired and motivated than you have been in a long time.
I wrote the guide to share my experiences and teach you the solutions I found working for me, so you don't have to make the same mistakes. I wouldn't say I liked the feeling of losing my motivation towards photography, so if you are in that place, I want to help you overcome it. If you are in a creative rut, you can use these tools to reignite your creativity. I know some of the things I'm sharing might feel over the top, but these things have worked for me, and you should be open to trying different things if you have lost your way. I'll also share my favorite books in the last part of this guide, where you can research and learn more about these topics.
Solitude – Mikko Lagerstedt
1. Break old patterns
If you want to change the situation you are in right now. It would be best if you started within yourself. It would help if you had a new perspective, and self-awareness is the starting point. If you don't know where you are at this moment, how can you improve your situation? When you are aware and accept that you have lost your inner motivation, it's much easier to start figuring out what you can do differently. You don't need to dwell on where you are now. Acknowledge that this is your situation and focus on what you can do to improve it. If you don't do anything about the lack of motivation, you will start to procrastinate and question your love for photography, and if it has been a big part of your life, you start to question your passion for life in general. Try to get yourself out of the loop of self-doubt.
I lost myself in the loop of self-doubt a few years ago, and it has taken me a long time to get where I am right now. I don't feel that I have mastered self-awareness, but my perspective has changed, and my internal motivation is back. I was searching for it for a long time. It wasn't completely gone; instead, it was buried in the old patterns and beliefs I had created for myself. The first step was to be aware of my feelings and thoughts. Every time I took photos or edited my photographs, I tried to be more aware of my emotions or thoughts and observed them negatively or positively. My self-talk was often very poisonous. No wonder I felt terrible about photography and lost my motivation.
Try to feel if your thoughts surrounding your creative art have been negative or positive. Do you feel that there is pressure to create from outside of you?
I think my negative self-talk started some time ago. It may have started from the work I was creating. If you are a perfectionist like me, it's hard to be positive about your work if you make mistakes or if people don't enjoy it as much as you thought they would. It's like a negative spiral: you start to feel awful about your work, lose momentum, and so the negative self-talk begins. If you have low self-esteem, social media can be a difficult place to be. Don't let anyone or anything prevent yourself from creating the things you enjoy the most.
At first, I tried multiple different ways to solve the feeling of inadequacy. I forced myself to photograph every day. I forced myself to wake up at 3.30 am every day for three months. I forced myself to be brutally strict to achieve my goals and plans for the day. If I didn't do or achieve the things I had planned, I despised myself. I forced myself to do many things that didn't help my confidence or creativity at all. It just made me feel bad, sad, tired, and on edge. I was not happy at all. Forcing myself to do things did not work for me. And it probably won't work for you either.
In my journey to reignite my love for photography, I had to break my old habits on how I looked at photography. When I first started photography, I wanted to create the most beautiful photographs there are. Not that I have any shape or form accomplished that, but it was my inner dialogue for a long time. Somewhere in my journey, I lost the plot. I wanted to reignite that feeling of creating something beautiful and inspiring.
Do you remember why you started photography? Have you lost your way? Can you reignite that spark of inspiration? We will talk more about goals and intentions in the next chapter.
A practice you can start doing straight away, which is an excellent way to be more aware of your thoughts and feelings, is journaling. It's simple and highly effective. I recommend you do it every day, at least six days a week. Write one page every morning to your journal, and let yourself write anything on your mind. Leave the internal filters off and write. The reason you do it is not the writing per see. Instead, it's the part where you realize that you are not your thoughts, and eventually, you become more aware of your self-talk, thoughts, and feelings. It is the first step in breaking old thought patterns. Think of the journal as a safe place for your positive and negative thoughts; you can write whatever you want. As you do it daily, you start to see how it can relieve you from those looping thoughts in your head. When you get that junk out of your head, you have more space for creativity and pleasing thoughts.
It would help if you didn't read your journal; it's not why you write it, and going back to your old thoughts and feelings can set you back in your process.
Productivity is never an accident. It is always the result of a commitment to excellence, intelligent planning, and focused effort.
— Paul J. Meyer
If you want to take journaling to the next level, have it with you all day and write down whenever you feel overwhelmed, sad, or angry. Leave your anger to the pages and move on with your day.
Another practice to be more aware of your thoughts and feelings is meditation, which is highly regarded in the self-help community. The benefits of meditation cannot be overlooked. Studies have shown that it can help you boost creativity and make you healthier and overall happier. Meditation has been part of my life for about seven years, and I switch different meditation practices from time to time. Meditation is a powerful practice, but in my opinion, it is not a solution to every problem you have. It can be a catalyst for change and increase creativity, but it can start to feel like a chore you have to do each day if you don't fix your act altogether.
Every morning I start my day with a 10-25 minute meditation. My current meditation practice is simple, focusing on the breath and releasing my thoughts.
Instead of doing more than one extended meditation every day, you can start with mini-meditation breaks throughout the day. A simple one to two-minute reflection in between your daily tasks is a great way to check in with your feelings and thoughts and remind yourself to be more aware of the moment.
Mini-meditation practice: close your eyes, take a couple of deep breaths and release your emotions, and move your awareness to the next task and set an intention on how you want to show up in the next segment of your day.
Breaking negative thought patterns
Use meditation, journaling, and mindfulness practices to be more aware of your thoughts.
Set an intention to break those thought patterns every time you feel bad.
Observe your self-talk: If it's negative while photographing, try to play through the negative thought. And when you have played it through, find a perspective where you create a different and more inspiring outcome to your view and situation.
Repeat the process as many times as whenever you feel bad. Eventually, you will be releasing the old behavior and are a step closer to reignite your motivation for photography.
Late Night Meditation – Mikko Lagerstedt
2. Set goals that inspire
The limitations you have set for yourself are not the truth, and those self-damaging thoughts can be broken when you don't follow old behavior patterns. You can break through those patterns with self-awareness as we went through in the last chapter, and the next step is setting inspiring goals.
When you first start photography, it's easy to learn new things and ways to be a better photographer, but as you learn more, it gets harder and harder to find ways to improve. You might think to yourself that "I already know so much; how could I possibly learn more?" It's is, of course, not true; you just have lost the way to grow and develop new skills. If you lose the aspect of growing as an artist, things will become dull and unenjoyable. Growing is what we do best. If you can't grow, you feel uninspired to do anything. There are always ways to improve. You must be more conscious of the opportunities for growth to happen.
My overall goal is to have an impact on people. It's the thing that inspires me in this quest we call life. For a long time, I believed that having goals was something self-centered. I needed to break that belief because goals can give you inspiration, motivation, and joy. You can feel much happier if you feel a sense of purpose towards whatever you are doing.
If you ask the authors that have written about happiness, having a purpose or mission in life is one of the most important things you can have to be happy and fulfilled. It's common to feel that you have no purpose, and when you are in this state, everything seems pointless. In my opinion, you need to develop a passion. It's not something you are born with necessarily. I don't believe your mission has to be such a grandiose thing that you have to matter or that you must be the one who inspires others or whatever it is. Your first job is to find what makes you do things that inspire you at this moment. It starts with clarity and knowledge of where you want to be in the future.
If you lose the aspect of growing as an artist, things will become dull and unenjoyable.
How can you find meaning in life? As Emily Esfahani Smith talks in a TED talk called: There’s More to Life Than Being Happy. Studies have shown that there are four different aspects of meaningful living. The first one is belonging. Belonging comes from relationships with friends and family who respect you as who you are intrinsically and where you respect others as they are. True belonging comes from love, and it’s a decision. The second is purpose. Finding a purpose is not the same thing; it’s less about what you want but what you give. The key to purpose is to use your skills to serve others. The third is transcendence. Those are the moments where you lose a sense of yourself and feel connected to a higher reality. It can come from different ways; some achieve it by looking at art, some might feel it when they create something like photography. Some find it by writing. The fourth aspect is storytelling. The story you tell yourself about yourself. Creating a narrative of your life creates clarity, and it helps you understand how you became you. Most people don’t realize that you can edit, reinterpret, and retell your story. It’s about perspective.
Having inspiring goals that root yourself in the present moment is the key to happiness and success. There is no point in living in the future or past. Choose to focus on your future by living in the moment. Remind yourself daily why you do the things you do, and it will inspire you to focus on positive things. There will be setbacks and hurdles, but you will be at peace no matter what happens when you feel encouraged to conquer those challenges.
I have had a lot of self-criticizing thoughts about what I should be doing and what inspires me. Because of my learned way of thinking as a perfectionist, it has been hard for me to accept where I'm at moments. Even when I'm writing this, I feel an inner pull not to share this stuff because some part of me tries to keep this information for myself and wants me to be safe and not feel vulnerable. But screw it, I don't want to live by "my" limitations. I want to share my knowledge, even if it is slightly unconventional or if I feel it makes me vulnerable.
About a year ago, I almost convinced myself that I don't want to photograph anymore. But in me, there was this underlying feeling that it was not the truth. I was lying to myself. It all was due to a lack of goals and aspirations. I had many conflicting thoughts about traveling and photography in general. As I don't want to harm our beautiful planet, I convinced myself that I don't want to travel at all anymore. But it is not the truth. Instead, I can make a more conscious decision towards traveling and what's right for the planet. Because I enjoy traveling, and I enjoy the feeling of seeing something new and different, I must continue to bring more experiences like that into my life. I prefer to choose other ways to travel than flying. If I fly, I try to select the best possible way to do so and compensate for it.
Instead of being overly critical of what you can or can't do, create goals that are inspiring. Give you the spark you have lost on your way. You can dream a little. How do you want to feel? Make that your desired goal. It's essential to be open to new sources of inspiration. Ask yourself the tricky questions. What is the desire you want to achieve in photography? If you had all the money, you needed what places you would travel and capture? If you had all the time, you needed what skill you would learn? If you had all the connections and work required, where would you want your photography to be exhibited? The questions you ask will determine your goals and desires. After you have at least five things you want to achieve in the next year to ten years, think of ways to reach those by being true to yourself. Being true to yourself is crucial. What does it mean? Well, if you don't want to harm the planet, for example, be creative and find ways to travel without flying. You don't want to have conflicting goals. It's not about the goal; it’s about how you want to feel when you get there.
Your process is not linear, and the path you have chosen as an artist is not the only way. How can we get better and set inspiring goals? Challenge yourself to do things outside of your comfort zone, skills that you never knew you could master. Set a goal to learn a skill that you have wanted to try out. Why wait? Just start! You won't be good straight away; you must put in the work to be great at it. If you don't start to harness new skills, you won't grow. In the end, what you want to create in your life comes down to the goals you have set for yourself. Let yourself dream and set goals that are inspiring and true to yourself.
Remember that if you don’t believe that you can achieve a goal you want. It’s not going to happen. So, how can we make ourselves believe we can achieve something? It’s not easy, and that’s why it’s much easier to create goals that feel achievable. You can have huge life goals, but if you don’t experience something that makes you feel that you can achieve those, you start to feel pessimistic and depressed.
The way you have lived until this day has shaped how you think about certain things. If success or confidence are things you think you are born with, you have a fixed mindset. You have to have a growth mindset to reach those goals that you thought were not possible. The goals you set have to spark inspiration and desire. Otherwise, you won’t pursue them.
Setting inspiring goals
Imagine yourself in 12 months.
What goals and accomplishments you want to achieve?
How do you want to feel when you achieve those goals?
Imagine yourself in 5 years.
What goals and accomplishments you want to achieve?
How do you want to feel when you achieve those goals?
Imagine yourself in 10 years.
What goals and accomplishments you want to achieve?
How do you want to feel when you achieve those goals?
Find three skills you want to master in the next 12 months.
Read and research each skill.
Find a mentor that masters the skill and study them
Set one self-development goal for each month
What do you want to be better in your personal life?
Use affirmations and remind yourself to study them every day or at least every week.
Read or listen to one book each week.
The Lost World – Mikko Lagerstedt
3. Achieve your goals
Now that you have inspiring goals, you have to beak those goals into tasks. With clarity on your next manageable task, you are more likely to complete it and be closer to reaching your goals. If you feel overwhelmed, see if you can create clarity by writing down your goal and then dividing it into five steps. With each step looking like a possibility, the overall goal doesn't look so intimidating. Schedule the tasks into your daily or weekly calendar. Now you start to see the whole picture, not just the overwhelming amount of things you have to figure out. Clarity is key.
Even when you have divided your tasks, it's not always easy to focus on achieving your goals. Whenever you feel like you don't have the self-discipline or focus on going through a more difficult step in reaching your target, try to use a technique I have learned to get most of my days and do most of the things I set out to do. I use a method I discovered with self-awareness; I call it "new identity." For example, when I'm working on something meaningful yet challenging, and If I feel that my work is not good enough, I play through the negative thought and then visualize: how I can make the outcome better? And ask: what does excellent work look like? It's like using an alternate perspective in different situations. It works sometimes, but it's not a bulletproof method.
Luckily, I recently stumbled across “Alter Ego” book by Todd Herman, which was insightful and added more power to what I was already trying to do. The concept is that you have created these beliefs and stories that do not help you achieve your dreams. The idea of the book is that you jump into a different personality or identity. An alter ego.
How it works needs practice, but it becomes more natural and potent when you get things going. Every time you feel tired or not happy with what you are doing. Use another perspective: what would your alter ego or highest self do in this situation? Would he feel tired? Would he get annoyed by little things? No, he would focus and enjoy the task at hand. He would destroy excuses and be sure to enjoy every moment. He wouldn't start checking email or social media to distract himself. He would take a deep breath and focus on the task. Now you take a deep breath and visualize the outcome you want to achieve, and keep on creating. Remember that you don't want to rush; focus on whatever you are doing with enthusiasm and intention. If you rush through your day, what was the point? You need to be present to experience life.
Concentrate all your thoughts upon the work in hand. The Sun’s rays do not burn until brought to a focus.
— Alexander Graham Bell
Using an alter ego is a powerful way to get out of those old thought patterns you have created in your life. By this simple perspective shift, I have been able to create more work that inspires me. I have learned more and focused on the things I enjoy creating. If you lack focus and discipline in tasks that are meaningful for you, use a perspective shift and play as a character in a different realm, as Todd Herman says, a "Heroic Self" in an "Extraordinary World."
Another more conventional but empowering practice you can do is each evening, ask yourself questions such as "How do I rate my day? Did I accomplish the things I set out to do today? What could I have done better? What steps will I need to take tomorrow that will make me feel better? How can I change my situation tomorrow?" Write down your answers and schedule the things you want to accomplish tomorrow on your calendar. With this simple practice, you can feel a difference in your life and build momentum.
You don't want to rush; focus on whatever you are doing with enthusiasm and intention.
When you become clear about the intention and benefits you will receive when you accomplish something you want, you will do the hard things more often than not. Use visualization when you are unsure how to accomplish something; it's a powerful way to create urgency. Close your eyes and visualize yourself at the end of achieving what you want. Focus on the feeling you have when you have reached your goal. See all the people enjoying and getting inspired by your work. Feel it. By creating this new perspective, you will be joyful now instead of waiting to be happy in the future.
Rewarding yourself is extremely important. Having only external rewards is a sure way to lose the joy of creating. Don’t let money, social media likes, follows, and attention be the only reward you get from what you do. It’s so much more important to have intrinsic rewards for your hard work. Make a system where you reward yourself mentally when you do what you set out to do. Say to yourself that you are doing well, and you are on the right path.
Never give up on a dream just because of the time it will take to accomplish it. The time will pass anyway.
— Earl Nightingale
Searching for the light – Mikko Lagerstedt
4. Taking action
As I'm looking back to my twelve-year journey in photography, I realize that I have had my ups and downs. I have found out to be one of the keys to my success, and for the other photographers I spend time with is perseverance. It's not a surprising thing, but many of us overlook it.
It's much easier to focus on things that don't matter and where you get that dopamine rush. Because someone else is developing stunning work, they must have it in their genes. Please don't believe it at all; it's paralyzing! We all can get better and create unique work.
I'm sure all of us sometimes lack the motivation to take photos, but I think it all depends on how fast you can bounce out of it. For me, it's sometimes hard to find balance. I love to share my knowledge with people, but I feel uninspired if I "can't" go out to photograph. I think we all have these assumptions of how we are and cannot do anything about it. Like I talked about in the second chapter, I believe that those are just scripts that run in the back of our minds to keep us taking action needed to break out from the jam we are in.
So what are the steps we can take to break out of these excuses and keep us motivated to create beautiful photographs?
Procrastination is the art of keeping up with yesterday and avoiding today.
— Wayne Dyer
4.1 Plan
Make a plan that is easy to follow through. I use a planner I have created when I'm planning my week. I don't plan all of my weeks. Instead, I use planning if I haven't been photographing lately or find it hard to go out and take photographs.
4.2 Make it Impossible to fail
I bet there have been times when you have woken up but felt that you need to keep sleeping instead of heading out to photograph. I know I have. Or you have been busy doing something else and forgot to go out and capture the sunset. We all have many excuses not to go out and photograph.
One of the best things you can do is prepare for it. Take the excuses away! Use the alter ego method I talked about in chapter three and make it impossible to fail. When you wake up and feel the need to sleep, imagine your highest self in the scenery you want to capture and see all the people admiring the photograph and inspiring them to go out into nature.
Do these the day before if you have a shoot planned:
Charge your camera & gear
Pack your gear into your backpack and keep it ready
Make sure you have gas, diesel, or your car charged if you wish to travel with it.
When you want to capture the sunrise:
Keep your clothes prepared near your bed
Make it easy to take a coffee or tea with you or grab one on the go
Cook your breakfast the day before
You can add any steps you think makes it easier to go out. If you have gone through all of these, I bet you would feel stupid not to go!
4.3 Take action no matter what
It sounds counter-intuitive, but if you doubt yourself, the only way to break out of that doubt is to take action. Go out and take photographs, no matter what. When you make a plan, you can always say to yourself that this is what you promised yourself, and if you wish to inspire others, you will do as your highest self would do. So listen to your past self and take action. Action-cycle is where you want to end up!
4.4 Stop spending time on social media
Scrolling the internet or using the smartphone instead of going out is a way to kill your productivity. I'm not saying that you should entirely stop using social media or any platforms that connect you with other creators and followers. I'm saying that you should have more time for creation than to watch what other people have done. Create work that inspires you! Get out of that dopamine loop.
Take a day off when you don't use social media, the internet, phone, computer, or eat junk food, listen to music, or anything that will give you a high hit of dopamine. Instead, you will take walks in nature, reflect on your goals, write your journal, and meditate. You will get bored, but that's the point. It's essential to balance your dopamine receptors once a week to get dopamine from more fulfilling tasks, such as creating something meaningful.
Fragile – Mikko Lagerstedt
5. Gratitude, happiness, and being truthful for yourself
Gratitude is a thing everyone has been talking about for years now. If you don't have some gratitude practice, I highly recommend you try one. The critical part of doing your gratitude practice is writing down things you are grateful for or meditating; you must feel good about the things you write down or think. It can be hard sometimes to feel gratitude, but it makes you more grateful and joyous of life if you practice the feeling part.
If you focus on the things you are thankful for, you will find more things to be grateful for in your life. It's a good reminder that not everything is about getting something out of your life. It's about the things you already have and enjoying life as it unveils. Everything you have done up to this point has all been for happiness, but things became complicated at some point in time. If you want to be happy, you must realize that happiness comes from within, not out. It's essential to desire in life, but it should be a desire that makes you happy from within, not external.
A gratitude journal is a great way to feel more thankful for what you have. If you follow my advice from the first chapter and write every morning a page to your journal, you can easily add a gratitude practice after that and write five things you are grateful for today. They don't have to be grandiose. Instead, they can be small things that make you feel happy for today.
Easy gratitude practice
Each morning or evening, write three to five things you are grateful for today.
Read what you wrote and try to feel the gratitude.
The Whole Universe Surrenders – Mikko Lagerstedt
6. Socialize or spend time alone
In the first chapter, I talked about how you need to change something about your situation when you want to feel different and in a creative rut. If you are the type of person alone most of the time alone, you need to socialize with inspiring photographers. Use social media as a tool to reach out to photographers that inspire you and who do the things you want to be able to do. Ask them if you could join them someday to photograph. Please don't be shy; it's relatively easy to socialize with other photographers.
On the other hand, if you find that other people influence you all the time, it's good to have time for yourself in solitude. Spend time alone to get insight into your goals, dreams, and ideas. What works for me in photography is to arrange a trip as often as I can by myself and one with other photographers. For example, I might have one longer trip each other month with photographers and one by myself. It all depends on how you feel at the moment. Scheduling time for yourself is crucial if you don't usually have any time by yourself.
Figure out where you are at the moment and take steps to change the situation. You can find the inspiration grow in you when you challenge yourself to do something different.
Absorb what is useful, reject what is useless, add what is specifically your own.
— Bruce Lee
7. Tools to get you going
When you have done all of the steps in this guide, I guarantee that you are on your way to being motivated to create work that inspires you.
Here are also some other ways you can raise your creativity that we often overlook.
Spend time in nature (without a camera)
Move your body
Stay hydrated
Be present
My book recommendations for your summer readings
The Artist Way – Julia Cameron A classic about creativity and habits.
High-Performance Habits – Brandon Burchard Not your typical creative guide, but a working practice of going for good habits.
Sometimes we feel overwhelmed while taking landscape photographs. And it’s natural, but with a few steps, you can improve your results immensely. Of course, there are many ways to improve your photography, but behaviors that make the most difference are frankly quite simple. In this article, I have collected some of my favorite ideas on how to improve your landscape photography instantly.
1. Create a plan
Suppose you struggle to produce enough landscape photographs. Using a planner makes things more manageable, and you will go out on shoots more often, and when you go, you probably get more out of your trips. The more you go out, the better chances you have to improve your landscape photography. A daily or weekly planner gives you a framework for your photography.
Listing location, timing, and weather forecast give you ideas for your photography. For example, if it's windy and cloudy, you might want to go to a place where you can capture the sea or urban views. You can start the planning with timing as well. If you're going to take photos of the sunrise, you need to figure out where the sun rises in a location and plan the shoot. Use websites and applications such as Google Maps, weather forecast, TPE, and PhotoPills to plan your trips.
Here is a five-day photography planner you can DOWNLOADfor free.
Having a plan is an important step in capturing beautiful landscape photographs.
2. Take it Slow
When you are finally at a location, take your time and explore the area without your camera. Take a moment and appreciate the surrounding nature, and then focus on capturing the view. Be patient with the light. It can change in an instance. If you rush through a location, it's pretty common to miss the shot you wanted to capture. Also, keep your smartphone away and try to focus on the photographing.
If you genuinely want to capture a place at a specific time, be there beforehand so you have time to find a subject that interests you. Remember that you can't take photos of everything, so take it slow and keep yourself focused on the image you are trying to capture.
3. Use a tripod
After a shoot, while going through your images, you find out that they are blurry and unsharp is the worst. Getting sharp photographs is essential; that's why I always take my tripod with me, even if I take pictures in the middle of the day. On location, I recommend that you experiment without the tripod. As you find a subject you are interested in capturing, take out your tripod and capture the scenery. To make sure you capture everything sharp, use a timer or a remote controller.
Focus stacking is sometimes necessary to get enough depth of field, and it is much easier when you have a tripod. And when using a tripod, you often don't need to focus stack because you can use longer shutter speed and more depth of field with a smaller aperture. Fewer steps are better than more.
Tripod also makes you slow down and see the landscape as you might not otherwise see.
4. Use The Best settings
Always shoot in RAW file format. The more information you can capture, the better. Don't let over– or underexposed images ruin your landscape photography. If you expose your photos correctly, you have far more chances to adjust the RAW images. Remember to check the histogram when you are out photographing. View the sharpness and focus point by zooming in on the picture on your camera; it only takes a few seconds but saves you from the headache of an unsharp image.
For most landscape photography, use the following settings
RAW file format
The native ISO of your camera (64 – 200)
Sharpest aperture on your lens (f/8.0 – f/12)
5. Learn Composition Guides
Suppose you don't want your images to look flat. Create more dynamic and eye-pleasing landscape photographs by using composition rules. For example, use the rule of thirds and leading lines to give your images more depth.
Before you go out to photograph, study other people's landscape photography and their composition rules to create it. Please don't copy their work; instead, use it as a framework.
Composition rules to study
Rule of thirds
Leading lines
Golden ratio
Framing a subject
Symmetry
Break the rules and experiment
Leading lines can give your image a sense of depth.
6. Get better at Editing
Don't underestimate the importance of editing in landscape photography. If you spend hours capturing the photographs, you should also dedicate time to edit your images. It's helpful to have a vision of how you want your pictures to turn out. Lightroom, Capture One, and Photoshop are all great for editing photographs. At the moment, I use mostly Lightroom.
If you want to improve your landscape photography editing immediately, check out my EPIC Preset Collection. I made it for different kinds of landscape photography situations. For example, if you have a forest photograph, you can easily follow through with the steps and create a stunning result with a few clicks.
Things to consider while editing your photographs
What is the subject, and how can you make it more clear?
Can you improve the composition by cropping the image?
Use radial and graduated filters to balance your shot.
More to come, so be sure to subscribe to my email list!
Use editing to balance the photograph. Above, I used the graduated filter both in the foreground and on the top part of the picture to make your eye focus on the mountains.
I hope you enjoy the tutorial and find something useful for your landscape photography! Let me know in the comments below if you have any questions and what you would like to see me cover next.
Until next time my fellow photographers, take care and keep on creating!
Are you tired of making tedious selections with the brush tool to your photographs in Lightroom? I know I’m. Lucky for us, this week, Adobe released updates to Lightroom CC, and Classic introducing new features, which I think will be extremely useful for most photographers. This article goes through the new artificial intelligent masking features and how you can use them to make better selections.
What is new?
Lightroom CC (version 5) & Classic (version 11) October 2021 update.
There is now a way to use artificial intelligence to make selections and masks quickly in Lightroom. There are two options, select subject and select sky.
You can control each of your masks from the masking panel, and have the chance to name the masks, so it's easy to find the mask you want to change. You can also invert the masks you have made by using these new tools.
The Masking Panel
Select & create a mask of a subject using artificial intelligence
Select & generate a mask of the sky using artificial intelligence
Name and keep your masks in one place
Refine the masks with any of the selection tools available
Duplicate masks and invert them with ease
Create masks using color and luminance selections
A quick guide to the new masking tool
1. Select the masking -tool and select a mask you want to create
2. After applying a new mask, you can find it in the mask-panel
3. If you want to refine the mask, simply click the mask and add or subtract. You can select a tool you want to use to edit the selected mask.
4. Make changes to the settings, such as exposure and contrast.
When to use masking?
It's a great way to create contrast and depth to your images.
It’s a fantastic way to balance the exposure.
To select the sky and adjust it separately from the rest of the image.
If you want to make adjustments to the foreground, invert the sky mask and edit it.
If your photograph has a subject, such as a lonely tree, you can select it with the subject selection mask option and edit it to make it stand out more.
Conclusion
I have now experimented with the new masking tools, and I have to say that they work really well. However, on some occasions, Lightroom couldn't find the subject, or the sky selection needed minor adjustments, but other than that, it is a welcome update.
PS. Let me know in the comments below if you have already tried the new features and what you think about them! Also, if you have any questions, feel free to ask me.
Until next time my fellow photographers, take care and keep on creating!
Do you want to capture the night sky with a beautiful and interesting landscape? In this tutorial, I'll teach you my process in astrophotography, from gear to capturing the photographs.
Whether you are new to astrophotography or an experienced nighttime shooter, I think you can learn a few tricks from this article.
1. What gear to use for astrophotography?
If you desire to capture the same kind of astrophotography as I do, you don't need a tracker or shoot stacked photos of the night sky. We will go through the dual exposure technique, but I try to keep the whole process simple. At the moment, I can't carry a lot of equipment because of my back surgery anyway.
Essential gear for astrophotography
A camera that can handle high ISO settings with low noise
Wide-angle lens for full-frame 14 mm to 24 mm, crop sensor 10 mm to 18 mm with an aperture between 1.4 and 2.8
I'm an Amazon affiliate. I get a small affiliate fee if you click the link and use it to make a purchase. Thank you!
2. Planning for astrophotography
It's possible to just head out at night and wish for the best. Sometimes it can work, but astrophotography is a lot about planning.
I usually start my planning with the moon phase. It's the timing of when the moon is visible and at what time. View the moon phase.
After you know what dates are best for the photograph you want to capture, you should check the weather forecast to have a clear sky.
Timing is also essential for astrophotography, and it can be a bit tricky if you want to capture the core of the Milky Way. From March to September in the Northern Hemisphere and September to March in the Southern Hemisphere, you will get the most impressive view of the Milky Way. It's because the earth spins around on its axis and how the angle changes in different seasons.
Before selecting a place for your shoot, check out a light pollution map and find a place with less light pollution. I recommend leaving a city or at least shooting the night sky outwards from the city.
Use tools like PhotoPills or TPE for location scouting and to figure out where the Milky Way is in the night sky. In the Northern Hemisphere, look towards the southern skies to see the galactic core. The core will start to be visible due southeast (Spring), due south (Summer), or southwest (Fall). In the Southern Hemisphere, look towards the south of skies to see the galactic core. In this case, the center will start to be visible due southwest (Spring) or southeast (Fall and Winter).
When you have done your planning thoroughly, you can now enjoy the best part: taking photographs. However, if you struggle to get sharp stars in your photos, practice the infinity focus point on your lens. You can do this when it's still bright outside or use a bright light in the distance to focus the lens using autofocus or manually with the viewfinder. When you see the stars or far away objects as small & sharp as you can get, the lens is focused on infinity. Take note of the focus point on your lens and see if you can find it manually. This process makes it much easier to shoot the stars later.
Use the rule of 500 for your camera settings. Your shutter speed equals 500 ÷ equivalent focal length so, if your full-frame equivalent focal length is 20mm, the rule of 500 means that you use a shutter speed of 500 ÷ 20 = 25 seconds.
The most common settings I use are ISO 3200–8000, 20–30 seconds exposure, aperture 1.4–2.8.
When you are ready at your planned location, take a moment and search for compositions and foreground elements that are interesting to you.
Use the Milky Way as a compass, so it complements the foreground elements. It's easier to find a composition if the goal is to have the Milky Way work with the framing.
When you find a shot that you enjoy, take the first shot and see if you can improve it by moving your camera.
Remember that you should try to expose the photograph to the right side of the histogram, which helps you achieve more information in the shadows and less grain.
More detail on the right side of the histogram, makes a good exposure for night photographs.
Capturing checklist for astrophotography
Use best settings for your camera and lens (rule of 500).
Always check the focus by reviewing the photograph.
Make the composition a priority.
Expose to the right; this means you have to expose the image enough so that you don't have to pull up the shadows in editing.
Divided – Dual exposure technique with a 14 mm f/2.8 lens.
4. The Dual Exposure Technique (Vision of Depth) for Astrophotography
Now you know the essentials of capturing astrophotography, so let's take the whole thing to another level. I have used this technique to capture some of my favorite star photographs for the past ten years. It's simple two exposure shot combined later in post-processing.
The key here is to capture as much detail as possible in the landscape. Take the star photograph first with the settings I listed above and then crank up the exposure (up to 1-10 minutes) to capture more light in the landscape. If your camera doesn't support a longer than 30 seconds exposure, you must use a remote controller.
If your composition needs more "air," use two vertical images to capture the scenery. After capturing the night sky upwards, tilt the camera downwards, so the horizon is barely visible in the frame.
When the foreground elements are close, you need to use a smaller aperture and adjust the focus, so the foreground is sharp. As you go through the photos you have taken, try to visualize the outcome and see you need to capture the scenery differently. Patience is the key here.
Dual exposure checklist
Capture the sky first.
Use prolonged exposure to capture more light in the landscape (1-10 mins).
Use two vertical shots if you need more space in the composition.
Adjust the focus if the foreground elements are not sharp enough.
Use a smaller aperture if you need more depth of field for your shot.
Lost in the Night – Dual exposure technique with a 20 mm 1.4 lens
Alright, that's it for this week's tutorial. I hope you enjoy it and learn something new! If you want to learn more of my techniques, check out my ebook Star Photography Masterclass where I go into more detail about all of these steps!
Do you enjoy astrophotography? Would you like to see an astrophotography editing tutorial? Let me know in the comments!
Until next time my fellow photographers, take care and keep on creating!
In the last week's tutorial, we went through Four Easy Steps to Capture Beautiful Astrophotography Landscapes. This week we follow through with how to edit your astrophotographs. Next week I'll write how to edit dual exposure astrophotography, so stay tuned and subscribe to my email list if you haven't already!
The photograph we are editing here was shot with the Nikon Z 7 and Sigma 20 mm f/1.4 lens. With ISO 8000, f/1.6, and 25 seconds exposure.
Like I wrote last week, if you expose the picture more, it gives you more room for editing in Lightroom. Pulling the shadows is much more challenging when you use high ISO settings. So, don't underexpose your images.
These settings were made with my EPIC Preset Collection, but you can follow along and make those changes by yourself. The EPIC Presets makes your workflow faster with an entire section dedicated to night photography.
Before & After astrophotography editing Lightroom CC
1. Basic Settings
Let’s emphasize the Milky Way and darken the image to look more like a night photo with the basic settings.
Darken the image more with the tone curves. Two points, top and bottom middle in the curves.
Input 188 – Output 180 Input 93 – Output 75
3. Graduated Filters
With the graduated filters, let’s apply light to the foreground and add contrast and detail to the sky. Because it's a simple photograph, we can use two graduated filters. The shortcut for the graduated filter is M.
If you feel fancy, you can also use the Select Sky feature, which works quite well for night photographs most of the time.
Foreground graduated filter
Place this filter in the bottom part of the frame. Using Temp and Tint, we try to match the overall colors in the image.
Temp – 14 Tint 4
The following basic settings boost the foreground brightness.
For this particular image, we don't need more detail in the foreground. To apply a smoother look, use the following settings.
Texture – 4 Clarity – 14 Dehaze – 14
Lastly, let's make the saturation lower and apply a noise reduction.
Saturation – 11 Noise 25
Milky Way graduated filter
Emphasizing the Milky Way is easy. Use the following settings if you don't have to boost it a lot.
Exposure – 0,67 Highlights 24 Whites 15
Clarity 9 Dehaze 10
Noise 16
4. Final adjustments
Apply a lens correction if you have a lot of distortion in your astrophotograph. When working with high ISO photographs noise reduction is essential. I don’t usually add much sharpening for astrophotography because it can create more noise.
Sharpening
Amount 50 Radius 1,2 Masking 10
Noise reduction
Luminance 15 Detail 45 Contrast 15
Post-Crop Vignetting
Vignetting is something I tend to add in the final stages of my editing workflow.
Last week I wrote about How to Edit Astrophotography in Lightroom. And as I promised, this week, we go through how to create dreamy astrophotography using dual exposure techniques in Lightroom and Photoshop CC.
I talk about the dual exposure technique in the capture part of this series, so make sure to check it out!
For this example, I shot two different exposures from the same view without moving my camera. I recommend that you take the first shot always to capture the stars sharp. After that, you can lower the ISO and increase the f-stop and exposure.
Settings for the photographs
Star exposure: ISO 8000, f/1.6, 20 mm, and 25 seconds.
Foreground exposure: ISO 4000, f/1.6, 20 mm, 134 seconds.
As you can see in the star image, the foreground was too dark, and it was necessary to capture a longer exposure to get more detail in the foreground. I had luck with the mist this evening, which makes it slightly easier to combine the photographs. But if you don’t move your tripod the blending process is quick and easy most of the time.
Shorter exposure on the left with more detail in the sky, and on the right, you can see more detail in the foreground.
After applying the settings, open both photographs as smart objects in Photoshop. It’s helpful to have the option to edit the RAW files inside Photoshop, so I recommend using Smart Objects.
2. Duplicate Layers
Go to the foreground exposure image in Photoshop and use shortcut CTRL+M, and right-click on the image. Select Duplicate Layer… and choose the sky image as the destination.
3. Creating Mask
Now you have both files in the same Photoshop document, save the file and continue creating a layer mask for the foreground layer.
Use the gradient tool. Shortcut G and default colors create a soft transition between the sky and the foreground.
4. Removing Distracting Elements
I like to go through the image and see if there are unnecessary spots, and in this case, I removed one rock and some long exposure noise dots. Use the clone stamp tool on a new layer and remove noise dots and elements you don’t want in the final image.
5. Final Adjustments In Lightroom
As the image is starting to come together, let’s save the file, and jump back to Lightroom to make the final adjustments.
Basic Settings
I want more contrast and slightly bluer colors for the image, so let’s make the changes in color temperature and use the contrast slider.
Temp – 4 Tint – 4
Exposure – 0,10 Contrast + 32
Highlights – 9 Whites + 18
Dehaze + 9
Add slight Post-Crop Vignetting from the Effects panel. I used – 6 and feather 100.
Let’s use the detail panel to remove noise from the long exposure.
Luminance 15 Detail 45 Contrast 15
Crop by using the crop tool, shortcut R.
As I made the final crop I noticed that the horizon was unbalanced so I added a Radial filter (shortcut SHIFT+M) to the left side of the horizon with settings: Exposure + 0,80 and Dehaze – 20.
And here is the final dreamy double exposure astrophotography landscape.
I’m excited and proud to announce my photo book, Landscapes with Soul. This collection of imagery is my best work captured from the coast of Finland to the mountains of Norway. It's an ode to the North. You can experience the breathtaking landscapes and moody seasons in this premium photo book. Along the way, I share behind-the-scenes details about how I captured some of my best work.
You can pre-order the limited edition book now and get it before Christmas, but act fast since this hand-signed edition is very limited!
It's been an eventful thirteen-year journey as a photographer with countless sleepless nights and unforgettable moments. I'm grateful for your never-ending support! None of this would be possible without your help. It hasn't been the easiest year of my life recovering from back surgery. Still, I'm hopeful for a healthier future and more photography adventures, and more photos to share with you along the way. I hope you enjoy this book as much as I have enjoyed creating the photographs. It was an epic journey putting it all together. Special thanks to the team I had the pleasure to work with to make it all happen.
PS. Yes, that's a rare photo of me holding the book.
Experience the breathtaking landscapes and moody seasons of the North in this premium fine art photography book from the comfort of your home. Landscapes with Soul draws from Mikko Lagerstedt's breathtaking portfolio of photographs captured over the last thirteen years. Along the way, Mikko shares behind-the-scenes details about how he captured such astounding images under challenging conditions.
From dusk till dawn, and from one season to another, you can travel in time with this beautifully crafted photography book you can proudly keep on the coffee table to invigorate yourself and others. Enjoy Mikko's fascination with photography and post-processing and see his unique style in the final images.
PREMIUM QUALITY
A handbound hardcover premium coffee table book
Printed in a high-quality art printing house in Finland
Book dimensions: 25 cm x 25 cm
132 pages of high-quality fine art paper (170 gsm)
The edition is limited to 500 books, including gift and special collections.